Category: How To Guides

List of simple tips and tricks of Smartphone, gadgets and browsers. These includes Tethering of smartphones, Enabling WiFi Hotspots, Browser optimisation, Tips and Tricks on Browsers etc.

  • How to Take screenshot on Lenovo K3 Note

    Lenovo K3 Note is one of the best value for money smartphone. It has decent specifications at very attractive price. Taking screenshot on Lenovo K3 Note is very easy. There are 2 ways through which you can perform print screen. Taking print screen on Lenovo K3 Note is useful if you want share your specific page or error message or even high score on specific game. So let us learn how to take screenshot on K3 Note.

    Read:

    Lenovo K3 Note Review

    How to download and Install Lenovo PC Suite

    How to Take screenshot on Lenovo K3 Note

    As I mentioned in the starting, there are 2 methods through which you can take screenshot on K3 Note.

    Method 1: The default Android Method

    This is most common way of taking screenshot. You need to press and hold volume down and Power button simultaneously. The screen will flicker and screenshot will be saved in Gallery folder.

    Method 2: Lenovo Vibe UI method

    • First you need to go the screen on which you want to take screenshot on Lenovo K3 Note.
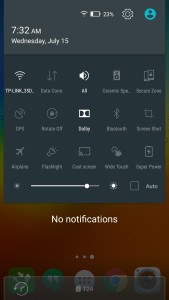
    • Go to Quick settings option by pulling the screen from top to down.

    How to Take screenshot on Lenovo Smartphones

    • You will have icon called screen shot. Tap on to it.
    • Here you have two options.
      • You select the area of the screen on which you what to capture the screen on K3 Note. You can do that by selecting the capture area.
      • If you want the whole screen to be captured then, tap on to Full screen.
      • If you want to share the screenshot with your friends, then tap on to share. You will get options to choose from the list through which you want to share the screenshot.

    Lenovo K3 Note runs on Android 5.0 Lollipop with Vibe UI. Vibe UI provides many customisation which are useful for many users. Option to select the area of a screen to take screenshot on Lenovo K3 Note is one of them. I have a made a video on how to take screenshot on Lenovo K Note.
    Video Guide on How to take screenshot on Lenovo K3 Note

  • How to take screenshot on Asus Zenfone 2

    Capturing screenshot on Asus Zenfone 2 series smartphones are very easy. Asus has provided three different ways to snap screenshot. Each methods are very easy and anyone can perform in few seconds.

    Below mentioned ways to take screenshot works on most of the Asus Zenfones such as Zenfone 5, Zenfone 6, Zenfone 2, Zenfone Laser, Zenfone Zoom, Zenfone Max, Zenfone Delux to name  few.  It will be useful if you would like to share your highest score in a game with your friend or save a online payment reciept or even sharing error message. Apart from this, there many other situations, taking snapshot of screen comes in handy.

    Also read:

    How to use Asus Zenfone 2 as Modem through personal hotspot, USB tethering and Bluetooth Tethering

    How to take screenshot on Asus Zenfone 2

    Asus Zenfone 2 has various variants. The different variants are based on the size of RAM and internal storage. There is also two variants based on screen resolution. One is 720 and rest 1080p.  All these variants runs on Android 5.0 Lollipop and ZenUI. So taking screenshot on Zenfone 2 all variants remains same.

    To take screenshot on Asus Zenfone 2 there are 3 methods available. They are: 

    1. Default Android Method
    2. Using the recent apps key
    3. Screenshot icon to the quick settings menu

    Method 1: Default Android Method

    For taking screenshot using this method, go to the screen on which you want to take the screenshot. The press and hold volume down key and power button simultaneously. The screenshot will be taken and it will be saved in photos folder.

    Method 2: Using the recent apps key

    This method taking screenshot is much easier than the previous method. To take screenshot on Zenfone 2 using this method, follow the steps given below.

    • Go to settings-> ASUS customised settings
    • Tap on to ‘Recent apps key’.
    • Choose the ‘Tap and hold to capture screen’.
    • Now go to the any screen on which you want to screenshot, tap and hold recent apps key(right side key of home button) for a second. The screenshot will be taken.
    • Captured print screen will be saved in photos or Gallery.

    Method 3: By adding screenshot icon to the quick settings menu.

    Zenfone 2 Print screen

    • Open the quick settings menu.
    • Tap on to the edit quick settings icon.
    • Under ‘select tools to show on quick settings panel’, select screenshot. Do remember, you can only select 4 tools. So, for enabling screenshot, you need disable any other other 4 tools which are already selected.
    • Tap on to save.
    • Now go the screen on which you want to take screenshot, and access quick settings panel and tap on to screenshot icon. The screenshot will be taken.
    • The captured print screen of Zenfone 2 will be saved in Gallery or photos.

    Video Guide on Taking screenshot on Asus Zenfone 2

  • How to Clear Cache Partition On Moto G

    Both first gen Moto G and 2nd Gen Moto G received the  Android 5.0.2 Lollipop update. The new Lollipop update brings in lot of new features such as material design, better battery life and better performance.

    But some Moto G owners post updating to Lollipop, started facing issues. Instead of improving Moto G performance,  it became slow and become less responsive. Even few users also notices, sudden draining of battery. Overall phone started behaving weirdly. What is the problem with Moto G Android Lollipop update?

    Android Lollipop has few issues which google already addressed in their latest update Android 5.1 and some are yet to be addressed. Having said that, optimising the Moto G will help to fix some of the issues. Normally, when Moto G becomes slower, users tend to reset to factory reset. If you reset your Moto G, then you will lose all the data. Instead, you can try wiping the cache partition. Clearing the cache memory solves 90% of the problems without losing any personal data. So How to Wipe or clear Cache Partition on Moto G? We will learn more on this.

    Read:

    How to use Moto G as modem

    How to  Clear Cache Partition On Moto G

    1. First switch off your Moto G. Ensure your device is fully charged and charger is unplugged.
    2. Press Volume Down key + Power Key for 2-3 seconds and  release.
    3. The phone will show different Boot Options.
    4. From the “Boot Mode Selection Menu” screen, select Recovery. Use Volume Use the Volume Down button to scroll through the menu options and the Volume Up button to select.
    5. You will see a screen on which Android figure lying on his back and “No Command” written on the screen.Moto G Clear Cache Memory
    6. Press and hold the Power button then press and release the Volume Up button to display the menu options.
    7. From the menu, select “wipe cache partition”. Here you need to use Volume buttons to highlight and the Power button to select.
    8. “Reboot system now” will be highlighted, press the Power button to select it.
    9. It will take several minutes(Around 5-6 minutes on My 1st Gen Moto G) to complete.

    This is the method, if you are running your moto G with Android Lollipop.

    Does Clearing Cache partition on Moto G deletes my personal files?

    No. It will not delete any of your personal files. This will only  remove any temporary files that may be causing the problem.

  • How to use Lenovo A6000 as Modem

    Lenovo A6000 is one the most affordable 4G Dual sim Android smartphone in India. The good internal hardware coupled with decent build quality and competetive price is the key attraction of this smartphone. In this tutorial, we will see, how to use Lenovo A6000 as modem through WiFi hotspot and USB tethering.

    Read:

    Take screenshot on Lenovo A6000

    Lenovo A6000 Review

    How to download Lenovo A6000 PC Suite

    How to use Lenovo A6000 as WiFi Hotspot

    As I mentioned earlier, Lenovo A6000 supports 4G speeds. So even if you are outside, you can get the broadband speed on your smartphone. It is worth to use Lenovo A6000 as WiFi hotspot to connect to internet from your laptop or PC. Do remember that, using WiFi hotspot will incur charges as per your data plan also it will drain your device battery faster. Let us have a look into how to use Lenovo A6000 as WiFi hotspot.

    1. Enable the mobile data.
    2. Now go to settings->More…
    3. Tap on to Tethering & hotspot.
    4. Now enable the WLAN hotspot moving the slider to right.
    5. It will enable your Lenovo A6000 as WiFi hotspot.

    How to customise Lenovo A6000 WiFi hotspot Settings.

    If you want to customise the settings such as SSID, password and security type, follow the step given below. Even if you wanto see the Lenovo A6000 hotspot password or just want to change or reset Wi-Fi hotspot password of Lenovo A6000 and A6000 Plus, follow the step given below.

    • Tap on to WLAN hotspot
    • Now go to Set up WLAN hotspot.
    • You enter or edit the SSID, password and security type in this page.
    • Once you are done, tap Save.

    How to use Lenovo A6000 as modem through USB tethering

    1. Follow the same steps mentioned above till the step 3.
    2. Now connect your device to PC or laptop using the USB cable.
    3. Now enable the USB tethering.
    4. Now mobile data will be shared to your PC.

    Video Guide on How to use Lenovo A6000 as WiFi Hotspot


  • How to take screenshot on Lenovo A6000

    Lenovo A6000 is a budget Dual sim Android smartphone with 4G capability. The device runs on Android 4.4 Kitkat out of the box with Vibe UI. Taking screenshot on Lenovo A6000 is very easy. There are two methods through which you can take screenshot. Here are the two methods to take screenshot on Lenovo A6000 4G Android smartphone.

    Useful Tips and Tricks Posts on Lenovo A6000 and A6000 Plus:

    How to use Lenovo A6000 as Modem: How to guide on using features like perforsonal wifi hotspot and USB tethering.

    How to download Lenovo A6000 PC suite: Tips to download and install USB driver and PC suite

    How to take screenshot on Lenovo A6000

    As mentioned before, there are methods. First one is the default Android method and another one is Lenovo Vibe UI exclusive method.

    Android Default method of taking screenshot on Lenovo A6000.

    Like any other Android smartphone, you need to press and hold Volume down and power button simultaneously to take screenshot.

    Vibe UI way of taking screenshot on Lenovo A6000

    • First go to the screen on which you want to take the screenshot.
    • Next go to quick notification area settings by swiping the screen from top to down using two finger.

    Print screen on Lenovo A6000

    • The quick settings has the screenshot icon.
    • Tap on to it to take the screenshot.

    Where the taken screenshot gets saved?

    The taken screenshot on Lenovo A6000 will be saved on Gallery folder.

    Video on How to take screenshot on Lenovo A6000