Author: Aniruddh

  • How to enable WiFi calling on Vivo Mobiles

    Airtel and Jio have announced WiFi calling facility for its users. One of the biggest advantages of WiFi calling is, you can make clear and crisp calls without call drops even if you are in an area where cellular signal is weak. In this post, we will have a look into how to enable WiFi calling on Vivo mobiles.

    Jio WiFi calling feature is designed to support both Voice(VoWiFi) and Video calls over any Wi-Fi network. Jio and Airtel users can seamlessly switch between VoLTE and Wi-Fi network without any delay. However, the user needs to activate WiFi calling on the device.

    You may like to read:

    How to enable WiFi Calling on Vivo Mobiles

    • Connect your Vivo phone to Wi-Fi.
    • Go to Settings.
    • Then navigate to Dual SIMs and Mobile Network.
    • Now tap on the sim card for which you want to enable WiFi calling.
    • Now tap on Wi-Fi Calling then on the next page enable Wi-Fi Calling.
    • Whenever Wi-Fi is available, the call will go through WiFi.
    How to enable WiFi calling on Vivo Mobiles

    Note: At the time of writing this, only Jio supports WiFi calling on Vivo phones. Some of the compatible Vivo phones are Vivo V17, Vivo V17 Pro, Vivo Y17 etc. For detailed compatible list of phones please refer here.

    Video Guide on How to enable WiFi calling on Vivo Phones

  • How to enable WiFi Calling on iPhone 11

    iPhone 11 is compatible with Airtel and Jio WiFi Calling feature. Whether you are a prepaid or postpaid customer, you can utilize the WiFi calling feature. iPhone 5SE, iPhone 6, iPhone 6S, iPhone 7, iPhone 8, iPhone X are the other iPhones which support WiFi calling. Here are the steps to enable WiFi calling on iPhone 11.

    How to enable WiFi Calling on iPhone 11

    Method 1:

    Enable WiFi Calling on iPhone 11
    • Go to Settings->Mobile Data.
    • Select the SIM profile if you are using dual sim.
    • Tap on Wi-Fi Calling.
    • Now enable the Wi-Fi Calling on This iPhone.

    Method 2:

    This method is available on most of the iPhones starting from iPhone SE to iPhone 11.

    enable WiFi Calling on iPhone
    • Go to Settings-> Phone.
    • Tap on Wi-Fi Calling.
    • Now enable Wi-Fi Calling on This iPhone.

    You may like to read:

    Video Guide on how to enable WiFi Calling on iPhone

  • How to automatically block unknown callers on iPhone

    iOS 13 has a new feature called Silence Unknown callers. If you enable this feature, it will eliminate most of the robocall and spam calls. The Best thing is it is free to use and does not require you to install any other app. So let us explore how to automatically block unknown callers on iPhone.

    This is a new feature works on all the iPhones running on iOS 13. It may be iPhone 11 or iPhone 11 Pro or iPhone 6s, it will work. Once enabled your iPhone will ring only if you know the person calling you.

    You may like to read:

    How to automatically silence unknown callers on iPhone

    How to automatically block unknown callers on iPhone
    • Go to Settings on your iPhone.
    • Navigate to Phone option.
    • Scroll down and find Silence Unknown callers.
    • Enable it.

    If you want to block certain contact,

    • Go to Settings>Phone.
    • Tap on Blocked Contacts.
    • Tap Add new…
    • Select the contact you want to block.

    Once this feature is enabled, your phone will ring only if the originating number is there in your contact, recent outgoing calls or is in Siri suggestions(Sourced from Mail or messages). All other calls will go directly to voice mail. However, the call details will be shown in the recent calls.

    Though it is a good option to reduce spam calls, it has a limitation as well. For example, if you are looking for a job, you may miss the job call as that number may not be in your contact list. Similarly, if you are ordered something online, delivery person call also may go to voice mail. So use this feature judiciously.

    Best option to block spam calls is by registering your number to DND list if you are residing in India. It will reduce spam calls significantly. However, you can enable this feature when you don’t want to get disturbed by unknown callers.

  • How to Share Live Photos as GIF in Twitter from iPhone

    Twitter recently added a new feature to its iOS app. The feature we are talking here is about the option to share Live Photos as GIF. Earlier, twitter iOS app had the option to edit the image which they want to tweet. Now user can convert live photos into GIF. So in this post, let us have a quick look into how to share live photos as GIF in twitter from iPhone.

    This new feature allows you to record short videos and upload them as GIFs via your iPhone. However, this feature is not yet added to twitter android app.

    You may like to read:

    How to share Live Photos as GIF in Twitter from iPhone

    • Tap on the new tweet.
    • Select photos option. Now you can select Live photos.
    • Choosing Live photos instead of all photos will help to select live photos.
    • Tap Add.
    • Now tap on “GIF” option at the bottom left corner of the live photo. Initially, there will be a cross line on the “GIF” option. Upon tapping, the cross-line will go off.
    • Now you can share the tweet. The live photo will be shared as GIF.

    There are many iPhone users already started using this feature. If you have share-worthy live photos, it is the time to try out this new feature. If you are an android user, you may need to wait for some time. However, you can use third-party apps to convert live photos and GIF in Android.

  • Whatsapp how to set up fingerprint lock

    Whatsapp is regularly adding many new features to its popular chat app for both iOS as well as Android devices. At the beginning of this year, it added Touch ID and Face ID unlock features to iPhone users. Now the Android users can add fingerprint lock to WhatsApp. So in this post, let us explore how to set up fingerprint lock to WhatsApp.

    WhatsApp fingerprint unlock provides an extra layer of protection for anyone who uses the app. This will work on any android phone with the capacitive fingerprint scanner or in-display fingerprint scanner. This feature will be available on Whatsapp version 2.19.221 or later.

    You may like to read:

    How to setup fingerprint lock in WhatsApp

    Before proceeding, ensure you have the latest version of Whatsapp. You can check for update in Google Play store WhatsApp page. Once you have WhatsApp version 2.19.221 or later, follow the below steps to secure your WhatsApp chats on Android with Fingerprint authentication.

    Time needed: 1 minute

    Steps to enable fingerprint lock in Android phones.

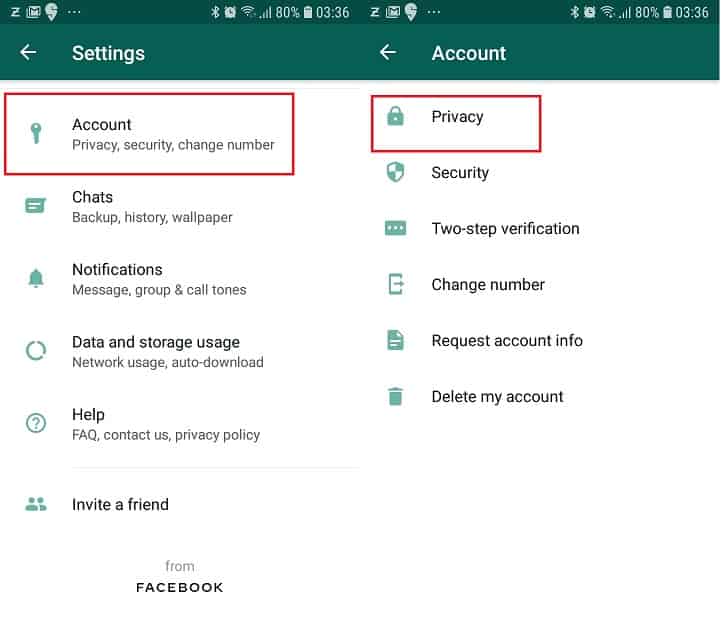
    1. Go to Settings

      Open the WhatsApp. Tap the three vertical dots icon on the top right. Now go to settings.
      Whatsapp settings page

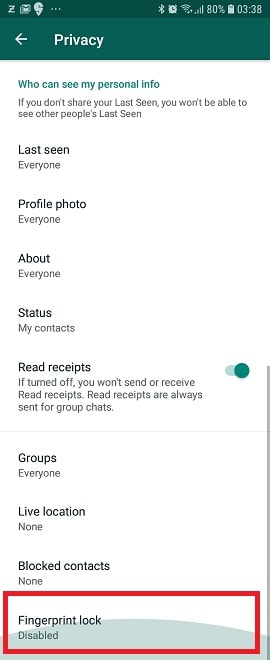
    2. Go to Fingerprint lock.

      Navigate to Account->Privacy. Scroll down till the end. You will find the Fingerprint lock. Tap on it.

      Fingerprint option in WhatsApp

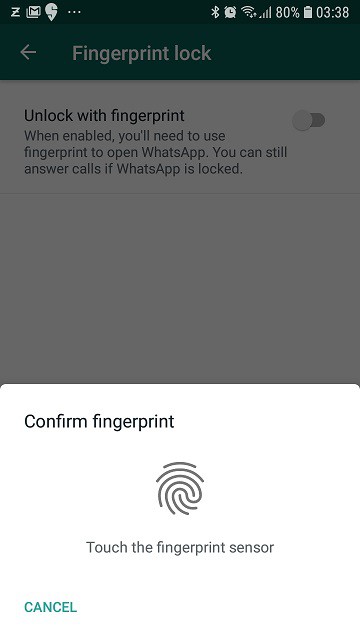
    3. Enable Fingerprint unlock

      Now enable unlock with fingerprint by tapping slider to right. You need to confirm with your fingerprint.
      Fingerprint enable

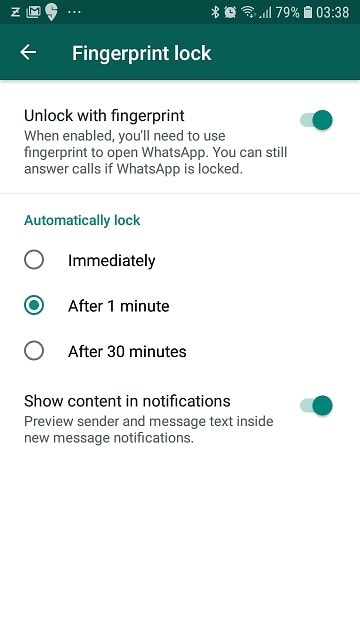
    4. Setup Automatic Lock

      You have the option to customise the lock timings. You can choose between, immediate, after 1 minute or after 30 seconds. If you want, you can disable the preview of sender and message in new message notification.
      Whatsapp how to set up fingerprint lock

    Now, whenever you open Whatsapp, depending on automatic lock duration you have opted, you need to authenticate to access the chats. However, you can take incoming calls even if the app is locked. Do note that, there is no fallback password option. That’s it for this quick guide on how to setup Fingerprint lock on Android.