Category: How To Guides

List of simple tips and tricks of Smartphone, gadgets and browsers. These includes Tethering of smartphones, Enabling WiFi Hotspots, Browser optimisation, Tips and Tricks on Browsers etc.

  • How to Take Screenshot on Asus Zenfone 2 Laser

    Asus Zenfone 2 Laser is most affordable smartphone under Zenfone 2 series. It has decent specification and competetive price tag. The laser focussed camera is the key attraction of this smartphone. In this post we will learn how to take screenshot on Asus Zenfone 2 Laser. The device runs on Android Lollipop with ZenUI. The ZenUI provide lot of customisation which enhances the user experience. It also includes many features which are very useful. For performing print screen on Zenfone 2 Laser,  there are 3 methods. You can choose any of these screen capture methods.

    Asus Zenfone Laser

    Recommended reading:

    Asus Zenfone 2 Laser Review

    How to take screenshot on Asus Zenfone 2

    How to use Asus Zenfone 2 Laser as Modem or Tethering

    How to Take screenshot on Asus Zenfone 2 Laser

    There are two variants of Asus Zenfone 2 Laser. Both variants support below mentioned ways of capture screen methods.

    Method 1: Default Android method

    It is the most common and widely used method of taking screenshot on any Android smartphone. For this you need to press and hold volume down key and power button simultaneously for few seconds. The screenshot is captured. You can access the taken screenshot from Gallery.

    Method 2: Using Recent apps key

    For taking screenshot on Asus Zenfone 2 Laser using this method, follow the steps given below.

    • First go to the “Settings”. Under settings, you will find “Asus ASUS customised settings” . Tap on to it.
    • In this, choose the ‘Recent apps key’.
    • Under Recent apps key settings, you will find “Tap and hold to capture screen”. Choose that.
    • Now, whenever, you want to take screenshot on any page, just tap and hold recent apps key to take the screenshot.

    Method 3: Take screenshot on Asus Zenfone 2 Laser using Quick Settings

    For enabling this method, you need to customise the Quick Settings menu in Zenfone 2 Laser. For that, follow the steps given below.

    • Go to Quick Settings page by swiping down the screen from top.
    • Tap on edit quick settings icon.
    • In the quick setting option, the top row provides only 4 tools. So you need to disable one app appearing in the top row and choose, screenshot.
    • Tap on to save.
    • Now when you need to take screenshot, go to quick setting menu, you will find screenshot option. Tap on to it to take the screenshot.

    Hope this tutorial on How to Take Screenshot on Asus Zenfone 2 Laser is useful. If you are facing any issues while following the instruction, please share it in the comment section below.

  • How to Take Screenshot on Yu Yunique

    Yu Yunique is the most budget 4G dual sim Android smartphone with HD screen resolution. It has got a decent spec sheet and very attractive price tag. There is one surpraising fact in this phone. This is runs on Android 5.1.1 Lollipop instead of Cynogen OS. So in this post we will learn on how to take screenshot on Yu Yunique.

    Yu Yunique 4G Android

    How to take screenshot on Yu Yunique

    Previous smartphones from Yu Televenture  such as Yu Yureka Plus or Yu Yuphoria had multiple option to capture the screen as those were running on Cynogen OS. But to do print screen on Yu Yunique we have only the one option that is through hardware buttons. So here we go.

    Recommended reading:

    How to take screenshot on Yu Yureka Plus

    • Go to the screen on which you want to take screenshot on Yu Yunique.
    • Now press and hold power button and volume down key which are placed in the right side of the device simultaneously for few seconds.
    • You will hear a shutter sound and screen flicker which gives a confirmation that, the screenshot is taken.

    Where the taken screenshot on Yu Yunique is saved?

    The taken screenshot can be accessed via gallery.

    Yu Yunique is powered by 64 bit Snapdragon 410 chipset with 1GB of RAM and 8GB of internal storage. It comes with 4.7 inch 720p HD display screen. Other key specification of this Yu Yunique includes, 8MP primary camera, 2MP front facing camera. The Yu Yunique price in India is Rs.4999. The device runs on Android 5.1.1 and not on Cynogen OS. The budget Dual sim Android smartphone supports 4G LTE in India. If you want to buy this smartphone, you can purchase from Snapdeal.com.

    Hope this guide on how to take screenshot on Yu Yunique is helpful. If you are facing any issues, please share it in the comment section below. I will making a video guide on how to take screenshot on Yu Yunique shortlly.

  • How to Disable Quick Look screen on Micromax Canvas

    Micromax Canvas series is one of the popular smartphones in India. It offers lot of features at affordable price. But, the major complaint with these smartphones are bloat wares. Many of the budget Micromax Canvas smartphones has limited storage. But due to lot of pre installed apps, the available space for the user gets restricted. One solution for this is by rooting the device and remove the unwanted apps. But this will void the warranty. In this Micromax Canvas Tip, I am going to show you how to disable one such app called Quick Look without rooting.

    Uninstall Quick Look on Micromax

    For uninstalling the quick look Launcher on Micromax Canvas, there might be several methods. The one which I found out  which is simple to do, I am going to mention it below. Hope this helps to many follow users.

    How to Disable Quick Look screen from Micromax Canvas Smartphone

    As I mentioned above, Quick Look is a preinstalled launcher in many Micromax Canvas smartphones such as Micromax canvas express 2, Micromax Canvas 4 plus, Micromax canvas nitro A311 etc. So there is no direct method of uninstalling Quick Look from Micromax Canvas smartphones without rooting. This tips will help you to disable Quick Look from Micromax Canvas smartphone.

    • First download and install any third party launcher from the Play Store. I personally like and recommend Google Now Launcher. Because it is clean and gives a feel of stock Android experience.
    • Make Google Now Launcher as the default Launcher.
    • Now go to Settings->Apps.
    • Go to All Apps and search for Quick Look.
    • Tap on to it. First Clear Cache.
    • Then tap on to Force Stop.
    • Now you will not be seeing the Quick Look screen on Micromax Canvas smartphone.

    Why you need to uninstall/Disable Quick Look on Micromax Canvas?

    It is optional. Some feel, it is not good. For me, Google Now cards are much better than Quick Look. Also, running apps in the background will impact on your Micromax Canvas smartphone performance to an extent. It will consume data for keeping the app/launcher up to date and consume battery as well. Disable Quick Look on Micromax Canvas will give you cleaner look to your smartphone.

  • How to take screenshot on Yu Yureka Plus

    Yu Yureka Plus is one of the feature rich smartphone. It has full HD screen, 4G LTE support, Snapdragon 615 Soc with 2GB of RAM. The device runs custom ROM Cyanogen Mod based on Android Lollipop. I have already made a review on this device. You can refer to that post. Yu Yureka Plus price in India is Rs.8999 after the price cut. For this price, this Dual sim Android smartphone considered to be one of the best value for money device. In this post, we will learn how to do print screen on Yu Yureka Plus..

    Read:

    Yu Yureka Plus Review

    How to take screenshot on Yu Yureka Plus

    The screen capture method on Yu Yureka Plus is very similar to its predecessor Yu Yureka. There are 2 different methods for Yu Yureka Plus screen capture. We will learn one by One.

    1. Default Android Method(Volume Down+Power Key Method): For using this method, go to the screen on which you want to take the screenshot. Now press and hold Volume down key and power button simultaneously. The screen will flicker. The active screen will be captured. The captured screenshot will be saved in Gallery-> Screenshot folder.

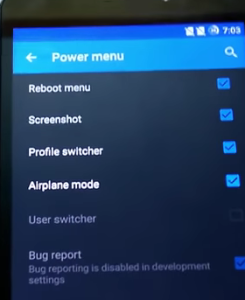
    2. Using the Power Menu: There is one more method to do print screen on Yu Yureka Plus. You can choose this  method, if you find the above method difficult.

    Yu yureka Plus Printscreen

    First you need to enable screenshot option in Power menu. For doing that, follow the method mentioned below.

    • Go to settings.
    • Go to buttons->Power Menu.
    • Now enable screenshot option in power menu by checking the option in front of screenshot.

    Now for taking screenshot follow the steps given below.

    • Go to the screen on which you want to take screenshot.
    • Now press the power button.
    • You will get a power menu options.
    • In the options you will find Screenshot option.
    • Tap on to it. The screenshot will be taken.
    • Taken screenshot on Yu Yureka Plus will be saved in Gallery-> Screenshot folder.

    Hope this guide on how to take screenshot on Yu Yureka Plus is useful. If you find any difficulties in following this or if you are getting any error message, feel free to share in the comment section below. Your feedbacks are appreciated.

  • How to Install Lenovo PC Suite and USB Driver

    Lenovo smartphones are getting more and more popularity with launch of Lenovo A6000, Lenovo a6000 Plus, Lenovo 7000, Lenovo K3 Note. All these smartphone are highly competitively priced and offers great specs. For connecting the Lenovo smartphone to PC through USB, we need USB drivers and PC suite. In this post, we will learn how to download and install Lenovo PC Suite. Lenovo USB drivers and Mobile Assistant PC are useful in syncing and accessing your smartphone from the comfort of PC.

    Other useful tips and tricks for Lenovo A6000 and Lenovo A6000 Plus:

    How to Take screenshot on Lenovo Smartphone: Guide on different methods available to perform print screen on Lenovo A6000.

    How to use Lenovo A6000 as personal WiFi Hotspot: How to guide on USB tethering and WiFi hostpot on Lenovo A6000,

    How to download Lenovo PC Suite and USB Drivers

    Lenovo does provide Lenovo Mobile Assistant and USB drivers in the device itself in the most of the smartphones such as Lenovo A6000, Lenovo a6000 Plus, Lenovo 7000, Lenovo K3 Note. For installing the USB drivers and Lenovo PC Suite, follow the steps given below.

    • First connect your connect Lenovo smartphone to PC through USB cable.
    • PC will open folder of your phone and a new drive will also get open.
    • In the folder, you will find USB driver and Lenovo Mobile Assistant.
    • First install the USB driver and then install the Lenovo Mobile Assistant.
    • Disconnect your smartphone from PC and launch Lenovo Mobile Assistant.
    • Now connect your smartphone to PC.
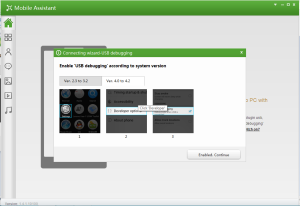
    • Enable USB Debugging.
    Lenovo PC Suite
    Lenovo Mobile Assistant
    • Now you will be able to access your smartphone from your PC.
    • You can view and send messages, see your contacts, manage audio and video files etc using the Lenovo PC Suite Mobile Assistant.

    How to download the Lenovo Mobile Assistant from Lenovo Official page

    As I mentioned above, you will be able to get the USB drivers and Lenovo PC suite from the smartphone itself. If any chance, it is not available, you can download it from the Lenovo downloads page or you can directly access from the link here.

    You can also install Lenovo Smart Assistant which is a software which is useful for easy and convenient way to upgrade your phone/tablet system through PC. This is compatible with Windows 7 (32-bit),Windows 7 (64-bit), Windows 8.1 (32-bit), Windows 8.1 (64-bit),Windows 8 (32-bit),Windows 8 (64-bit),Windows XP (32-bit),Windows XP (64-bit). The size of download is 5.7MB. For download and install Lenovo Smart Assistant Click on the link here.