

Author: Aniruddh

  • How to unhide first row or Column in a Excel Worksheet

    At times, in Excel worksheet the first row(Row 1) or first column(column A) doesnot show up. It is tricky to unhide  the first row or column as there is no easy way to do it. Based on the situation, you need to apply different method to access the first row or column. So here is the quick possible reasons for hidden first row or first column.
    Reasons and Solutions  for Hidden First Row or First Column
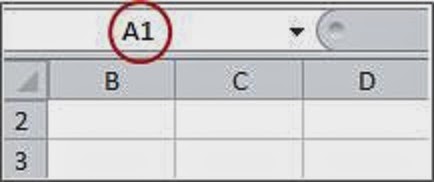
    Hidden First row or Column
    1. The row or column is hidden: Most of the time we might have hidden that row or column. Unhiding first row or column is as said earlier is not easy. For doing so, simplest method is to select whole sheet and right click and select Unhide.
    2. Another possibility is freezed columns or rows: If a excel worksheet has freezed row or columns, then also you will not be able to access some rows and column. Try Unfreezing by going to View->Freeze Panels.
    3. Row or Column size reduced to very small: Some excel worksheet which we get has very small sized row or column which we cannot see the row or column. In this scenario, select entire worksheet by selecting entire row. Right click and increase row height. If it is column, then select columns and enter higher column width.
    Other solutions for unhiding first row or column:
    1. In the Name Box next to the formula bar, type A1 and then press ENTER.
    2. On the Home tab, in the Editing group, click Find & Select, and then click Go To. In the Reference box, type A1 and then click OK.
    Hope these steps helped you to unhide your excel worksheet first row or column. Still if you have any problems share it in the comment section below.
  • How to use Moto G as modem to connect to PC

    Motorola Moto G is one of the best mid range smartphone. It is not as powerful as the most of the flagship smartphone in terms of the specification but in real time performance is outstanding for the price it is available. The price of Moto G is $179. The Moto G runs on Android Kitkat OS and powered by Dual core processor with 1GB of RAM. In this post let us see how to use the device as modem to connect to PC. This method of using Moto G tethering works with both the editions of Moto G.

    Read: moto g 2nd generation pros and cons & Pros and Cons of  Moto G .


    Motorola Moto G as modem

    How to use Motorola Moto G as modem to connect to PC

    To use Moto G as modem, you need to first enable the USB tethering. To do this follow the below steps.
    Step1:  Touch to the Apps.
    Step 2: Go to Settings.
    Step 3:  Tap on to More.
    Step 4:  Go to Tethering & Mobile Hotspot.
    Step 5:  Check the box for USB Tethering. Do note that, if you enabled WiFi or if USB cable is not connected, then USB tethering option will not be enabled.
    Once the tethering is enabled, Moto G works as a modem to use internet from PC. You can disable USB tethering by unchecking the tethering & Mobile Hotspot.
    Note:
    1. Moto G Tethering works with Windows Vista, Windows 7 and popular linux distributions such as Ubuntu, Fedora etc.

    2. Even you can also use Motorola Moto G as WiFi Hotspot to connect to any WiFi enabled devices using the Mobile Hotspot feature.

    How to use Moto G as WiFi Hotspot

    • Enable the mobile data on your Moto G.
    • Go to Settings->More–>Tethering & Mobile Hotspot
    • Check the Mobile Wi-Fi hotspot to enable WiFi Hotspot.

    Customising Moto G WiFi Hotspot Settings

    • Go to Settings->More–>Tethering & Mobile Hotspot
    • Tap to Set up Wi-Fi Hotspot.
    • Enter or Edit the Network SSID, Security Type and Password according to your wish.
    • Tap Save to save the settings.

    Moto G and Moto G 2nd Generation are the best priced well features smartphones available today. The timely Android upgrades, makes this device one of the most attractive phone to buy.

    Video Guide on How to Use Moto G as Wi-Fi Hotspot

  • Nokia Lumia 520 Review-Advantages And Disadvantages

    Nokia Lumia 520 is the most affordable Windows smartphone available in the market right now. It has 1GHz dual core processor and runs on latest iteration of Windows mobile OS Windows Phone 8.  Good touch screen and Nokia own apps makes this device one of the best deal to get it. The Nokia Lumia 520 latest price in India is Rs.8500.

    The Nokia Lumia 520 has 4 inch TFT capacitive touch screen with a resolution of 800X480 pixels and pixel density of 235 ppi. The touchscreen works even if you operate through key chain or finger nail. The screen produces good viewing angles and has scratch resistant glass. Nokia Lumia 520 is powered 1GHz dual core Krait processor with 512MB of RAM and adreno 305 GPU.

    Nokia Lumia 520 Smartphone

    The internal storage capacity of Lumia 520 is 8GB. The memory can be further added upto 64GB through microSD card. The connectivity features includes GPRS, EDGE, 3G, WiFi, Bluetooth and USB. The device has 5MP primary camera for taking the snaps or recording videos. Nokia Lumia 520 camera is not as good as Lumia 720 but it does decent job for the price. The device is fuelled by Li-ion 1430 mAh battery which provides a power backup of 14 hours of talk time.

    Nokia Lumia 520 Disadvantages

    • There is no front facing camera and LED flash for the primary camera
    • Some of the popular apps are not available on Windows platform.
    • No USB tethering is possible
    • The call quality is not that great.

    Nokia Lumia 520 Specification

    • 1GHz Dual Core Processor with Adreno 305 GPU and 512MB of RAM.
    • 5MP autofocus primary rear camera
    • Microsoft Windows Phone 8 OS
    • 8GB Internal storage.
    • Expandable storage upto 64GB via microSD card.
    • Li-ion 1430 mAh battery
    • 4 inch IPS capacitive touch screen with WVGA resolution and 233 ppi pixel density.

    Nokia Lumia 520 Tips and Tricks

    Taking screen shot on Lumia 520: Taking a screen shot or print screen on Nokia Lumia 52o is very easy. Just press and hold power button and Windows button. You will hear a shutter sound for the confirmation. The screen shot will be saved in the gallery.

    Read: How to take screenshot on Nokia Lumia Smartphone.

    Nokia Lumia 520 as modem: The current stream of Android devices can be used as modem using the USB tethering or WiFi hotspot features. But Windows platforms do not support USB tethering. So to share data connection of Lumia 520 with PC, you can use Internet sharing feature. This feature enables the Lumia 520 as WiFi Hotspot.

  • How to Remove spaces from a cell in Excel

    In today excel tip let us discuss on how to remove leading space and trailing space in a cell of Excel worksheet.  By default there are three excel functions which are very useful in removing the space in a cell. The Excel function we are going to use cleanup the cell are CLEAN, TRIM and SUBSTITUTE function.

    TRIM Excel Worksheet Function:
    The TRIM function is used to remove spaces from a text excluding the one which is there in between two words. The syntax of TRIM function is as follows.
    TRIM(text)
    Examples:
    TRIM(A17) which removes the spaces in the starting of the text and end of the text.
    CLEAN Excel Worksheet Function:
    The CLEAN worksheet function removes all the non printable characters from the text. In real time, we can use CLEAN function for data which is exported from the other applications which contains characters that may not print with your operating system. The syntax of CLEAN function is as follows.
    =CLEAN(text)
    If you want to remove non printable characters as well as space, then you need to first use CLEAN function and then use the TRIM function.
    SUBSTITUTE Excel Worksheet Function
    The substitute function helps you to replace old text with new text. The syntax for substitute function is as follows.
    SUBSTITUTE(text,old_text,new_text,instance_num)
    Text     is the text or the reference to a cell containing text for which you want to substitute characters.
    Old_text     is the text you want to replace.
    New_text     is the text you want to replace old_text with.
    Instance_num     specifies which occurrence of old_text you want to replace with new_text. If you specify instance_num, only that instance of old_text is replaced. Otherwise, every occurrence of old_text in text is changed to new_text.
    As you could has assumed, now we can use this formula to replace blank with non blank. Look for the example below.
    =SUBSTITUTE(A1,” “,””)
  • Samsung Galaxy Note 3 Multi Window Tips

    We have seen multi window sidebar features in Galaxy Note 2,Galaxy S3, Galaxy Grand etc.  But with Galaxy Note 3, Samsung has introduced much improved and more feature rich Multi Window Feature.  In 5.7 inch full HD display, the Multi Window feature works flawlessly.  The previous models, one needed to change the screen constantly to suite the particular function we were using. But in the latest Samsung Galaxy Note 3, you can do two different tasks simultaneously such as looking up webpages while sending text in a single screen side by side.

    Multi Window Sidebar in Galaxy Note 3

    How to Use Multi Window Feature in Samsung Galaxy Note 3

    Activating muti window feature in Samsung Galaxy Note 3 is very easy.  Here is the quick steps which will useful for activating and using the multi window feature.

    Step 1:  In the home screen, swipe down from the top of the screen. This opens a quick settings bar.

    Step 2: Swipe to right till you get the Multi window icon. Tap on it to enable the Multi Window.

    Step 3: The left side middle of the screen you will find a arrow mark.

    Step 4: Drag the application in the Multi window sidebar to the main window.

    Step 5: Drag the another application which you want to work along with the first opened app.

    Step 6:  You can adjust the size of the windows by moving the split bar handle.

    Step 7: Thats it. Start working on the both the applications at time.

    How to Disable Multi windows Side bar in Samsung Galaxy Note 3

    Follow the same steps 1 & 2 given above. As you know, when you first tap it, it will enable and if you tap it twice it will get disabled.

    Creating Paired windows

    As  mentioned earlier, muti window feature of Samsung Galaxy Note 3, you work with two apps at time. If you are using two apps always together, then you can use this feature. Using the Paired windows feature, you create a single to open two apps at a time with single tap.

    Step1:  When you have two apps open, Tap arrow key from the left of the screen.

    Step2: Tap on to see more option

    Step 3: Tap the create button.  New pop us comes up.

    Step 4: Enter the name  you want to give it to the paired window.

    Step 5: Tap Ok. Paired windows is created.