Category: How To Guides

List of simple tips and tricks of Smartphone, gadgets and browsers. These includes Tethering of smartphones, Enabling WiFi Hotspots, Browser optimisation, Tips and Tricks on Browsers etc.

  • Changing Ruler’s unit of measurement in Word 2010

    We will be come across a situation where we need to change the ruler measurement from cm to inches in word 2010 or some other metrics. MS Words offers many units of measurements such as Inches, Centimeters, Millimeters, Points, Picas. Here is the simple steps to change the measurements in Word 2010.
    Steps to change the measurements in MS Word 2010:


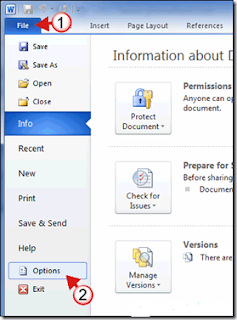
    1. Click on File to open the Backstage.
    2. Click on Options.
    3. Once the Word Options window opens, click on Advanced on the left pane.
    4. Scroll down the list until you find the Display heading.
    5. Click on the drop-down and select the unit of measurement you wish to use.
    6. Once the unit of measurement is selected, click OK to save the changes.
  • Hiding Partitions on Windows OS

    Windows offers a simple way to hide and un-hide  disk drive partitions. The below tip works with all the versions of Windows which supports NTFS. There is another option in windows which allows you to hide the partition from My computer and using the entire drive space by mounting the drive on another drive.

    Below mentioned way of hiding partetion doesnot require any third party softwares. It is done using the default feature of Windows. I have tested this on Windows 7.

    Steps to Hide Drive partition in Windows

    • Right-Click on My Computer [Computer in Windows Vista and Windows 7]
    • Click on Manage
    • From the list of options Click on Disk Management that will be located in the left-bottom section
    • All your hard disk and its partitions will be show in the right hand side
    • Right-Click on the partition that you want to hide and select “Change Drive Letters and Path”
    • Click on “Remove” and click “Yes”
    • Your drive will now be hidden in my computer

    Steps to unhide the disk partition in Windows

    • Go to Disk Management Right-Click on the hidden partition [there will not be a drive letter on the hidden drive] again select “Change Drive Letters and Path”
    • Click on add and select an appropriate drive letter.
    • Click Ok
    • Now the drive is unhided.

    Steps to Hide Drive partition from “My computer” and mounting on other drive

    • Go to Disk Management
    • Remove the drive letter
    • Again right-click on the drive and click : Change Drive Letter and Path
    • Now click add and select the option which says: Mount in the following empty NTFS folder.
    • Now browse to the desired location and select an empty folder or add a new folder.
    • Click Ok twice and close disk management.
    • You can check the folder which you used to mount the partition to.

    If you have any other solutions or having issues following the steps given here, then please share your thoughts in the comment section below.

  • Saving contacts in CSV format from Outlook 2010

    For back up the contacts or moving contacts, we require to export contacts from Outlook. One of the way is to save the contacts in Excel CSV format. Saving contacts of MS outlook 2010 in CSV formats has many advantages such as searching and ordering of contacts in Excel or Access. Even though Outlook 2010 supports, exporting of contacts in many formats such as Microsoft Access file or xls or csv.

    Due to different tool uses different formatting, .csv format comes more handy. It just takes the content and not the format. One more advantage of exporting contacts from Outlook in CSV format is, you can even import this contacts to your android smartphones. So we will learn how to export the contacts from Outlook and import them in to Microsoft excel.

    Steps to Export Outlook contacts as CSV file:.

    • Open the Outlook contacts for exporting and click on the “Contacts” field in the navigation field of the application.
    • Click Open the “File”  tab in the multi function bar and click on the function “Open” and “Import”
    • Select the option “Export to a file” and click on “Next”.
    • Mark the “Comma Separated Values(Windows)”  on the next page and again click on “Next”
    • Now select the contact folder and give “Next”
    • Select the target location where you want to save the CSV file
    • Click on “Next” and “Finish” to start the export

    Importing CSV format contacts to Excel:

    • In Excel  2010 click on “Data” Menu and then select “From Text” option
    • Select the CSV file which you have exported from Outlook and start the wizard for text conversion by pressing “Import”.
    • On the first page of the wizard, activate the option “Delimited”.
    • In second page remove Tick mark for “Tabular” and set it for “Comma”
    • Select next and Click on Finish.

    In Excel you format the contact in your desired way. You can delete duplicate contacts, merge contacts and perform many tasks which you might be already aware. For importing the contacts to gmail or Android phone, it has standard format. Just align the contents to according to standard format and import.

  • Write Rupee Symbol using Keyboard Keys

    Rupee got symbol last year. The font for rupee symbol  is added in Microsoft update. However the manuals do not mention about what are the keys to  use to get  rupee symbol. After searching a lot on internet and manual experiment i got below solution. That is I am able to use rupee symbol ₹ using the key which contains rupee symbol or the keyboards without rupee symbol can use the key with $ symbol. This works for most of the keyboards. Below steps will demonstrate on how to use Rupee symbol (₹). If you want to insert Rupee symbol in Excel, please refer my post on Type  Rupee Symbol in Excel 2010.

    Steps to write Rupee symbol using keyboard:

    • Download the Microsoft driver update which enable the Windows to detect rupee symbol. You can download Microsoft update which supports rupee symbol from here.
    • Download the appropriate version of the update based on your version of Windows.  Once download completes, install the update.
    • In Control Panel, click Clock, Language, and Region, and then click Change keyboards or other input methods.
    • On the Region and Language screen, click Change keyboard on the Keyboards and Languages tab.
    • On the Text Services and Input Languages screen, click Add.
    • On the Add Input Language screen select English (India), and then select the India keyboard check box.
    • Restart the system.
    • Now your keyboard will be able to write rupee symbol.
    • For writing rupee symbol now on wards use Ctrl+Alt+₹(4 or $ on regular key). The Keyboards without rupee symbol, can use Ctrl+Alt+$

    Write Rupee symbol in Dell Laptops

    The method given above works with most of the laptop keyboards and normal keyboards. Recently, I was working on Dell Vostro laptop and above shortcut didn’t worked. In this situation, as mentioned above, you need to change the keyboard layout to India and then use right Alt+$(4). This made me to write rupee symbol on Dell Vostro laptop. Please share you have problems using Rupee symbol in any other keyboards.
    Note:

    • This works with most of the keyboards irrespective whether rupee symbol is present on the key or not. The key with $ will be used to write rupee symbol.
    • Once the rupee support update is installed, we can use rupee currency in excel sheets to as currency format.
    • The using above method to type Rupee symbol using Keyboard key worked well with Logitech Keyboard and Dell Laptop keyboard.
    • Same combination of keys will type rupee symbol in MS Word, Excel or any Microsoft Office documents.

    Incoming Search words:
    Type Rupee Symbol in Keyboard
    How to Type Rupee symbol in Keyboard
    Type Indian Rupee Symbol on keyboard
    Type Rupee Symbol in Dell Keyboard
    Type Rupee Symbol in HP Keyboard

  • Equations in Blogger | CodeCogs Equation Editor

    There are many situations where we need to write equation or quotes of some one in blogger. So writing the formulas with super script in blogger needs little coding. The detailed step by step guide to write equation in blogger is given by codecogs.com.
    To use the subscript and superscript in blogger, we need to take the help of Latex script. To install this script follow the instruction given below.
    Steps to Write equation in Blogger
    Step1:  Open Blogger.com and login.
    Step 2: Go to Layout from the drop down list menu underneath the “More Option” Button.
    Step 3: Within the manage Blogs section, select Design.
    Step 4: On the right hand side, click Add a gadget.
    Step 5: Select the ‘HTML/Javascript’.
    Step 6: Before entering the following text, make sure that you are in ‘Edit HTML’ mode(you are in that mode when that ‘Rich Text’ title is showed in upper right corner), enter the following text into the ‘Content’ area:

    Now select ‘Save’ and exit.Before entering the following text, make sure that you are in ‘Edit HTML’ mode(you are in that mode when that ‘Rich Text’ title is showed in upper right corner), enter the following text into the ‘Content’ area:

    Now select ‘Save’ and exit.
    This script is made to work only convert equations within the …
    and
    You might me thinking why equations found anywhere are not converted, this is dangerous because other scripts may place javascript within your page, which might also contain ‘$’. In particular if you use any jQuery scripts on your page then you’re likely to experience problems.
    Note: If you are using the Dynamic view templates of blogger then, you need to add following script on the end of post while composing in HTML mode.
    Equations in Blogger | CodeCogs Equation Editor:

    Note: Writing equation sin wordpress is very easy. You just need to enable Beautiful Math in jetpack. Using that module you can easily type equation in wordpress blogs.