Category: How To Guides

List of simple tips and tricks of Smartphone, gadgets and browsers. These includes Tethering of smartphones, Enabling WiFi Hotspots, Browser optimisation, Tips and Tricks on Browsers etc.

  • How to take screenshot on OnePlus X

    OnePlus X is considered to be a very good mid-range Android smartphone. It has decent power, elegant look, and an attractive price tag. I already made a post on OnePlus X review which talks about pros and cons of the device. In this post, we will learn one tip on this device. That is how to do the print screen or screen capture on the OnePlus X.
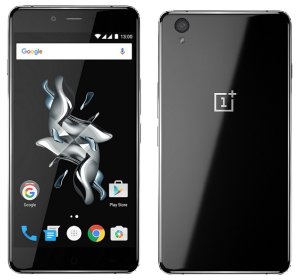
    OnePlus X Dual sim
    OnePlus X

    How to take screenshot on OnePlus X

    OnePlus X runs on Oxygen OS based on Android 5.1. So there are two ways through which you can do the print screen on OnePlus X. The first method is through the default android method or Volume Down Plus Power key method. The second one is using the power menu option. This method of screen capture on OnePlus X does not need any third party apps. It works with default apps and settings.

    How to take screenshot on OnePlus X using Power Button and Volume Down Button or Default Android Method

    This is the most common method of taking a screenshot. Most of the Android smartphones support this method of taking the screenshot and OnePlus X is not an exception. So let’s explore this method of taking screenshot.

    • Go to the screen or App on which you want to take a screenshot.
    • Press and hold volume down and power button simultaneously.
    • The screen will flickr and shutter sound will be heard.
    • The screenshot will be saved in Gallery->Screenshot folder.

    How to take screenshot on OnePlus X using the Power Menu option

    Comparing with the above method, this is the easiest way of taking a screenshot on OnePlus X.

    • Go to the screen or App on which you want to take screenshot.
    • Long press on Power button.
    • You will get a power menu.
    • Tap on to the “Screenshot” Options.
    • It will take the screenshot.
    • The taken screenshot will be saved in Gallery->Screenshot folder.

    Hope this guide on how to take screenshot on OnePlus X is useful. If you face any issues or anything you want to share use comment section below. Also, share any other useful tips you have got with OnePlus X.

  • Motorola Moto X Play Screenshot and Tethering Guide

    Motorola Moto X Play comes with decent specifications at affordable price. Running on Android 5.1  it offers pure Android experience. This device will be getting the Android 6.0 update very soon. In this post we will learn how to take screenshot on Motorola Moto X Play and how to use Moto X Play as modem.

    Recommended Reading:

    Motorola Moto X Play Review- Pros and Cons

    Moto X Play Dual

    How to take screenshot on Motorola Moto X Play

    Performing print screen or screen capture on Moto X Play is very easy and same as other Android smartphones.

    •  First go to the screen on which you want to take screenshot.
    • Press and Hold Volume down and Power Key simultaneously.
    • Screen will flickr and shutter sound will heard which confirms screenshot is taken.
    • The take screenshot will be saved in Gallery->Screenshot folder.

    How to use Motorola Moto X Play as Modem

    We can use Motorola Moto X Play as modem through personal wifi hotspot, USB tethering and Bluetooth tethering features. All these ways uses Mobile data and hence charges may apply as per service provider. Enable the mobile data/Cellular data and then follow the steps given below.

    How to use Moto X Play as personal WiFi hotspot

    • Go to settings->More…->Tethering & mobile hotspot.
    • Enable the Mobile Wi-Fi hotspot.
    • For customizing/entering new password and SSID, tap on to Set up Wi-Fi hotspot.
    • You can enter your desired password and SSID id here.
    • If you forgot your hotspot password, then this page itself, tap on to Show password. The password will be shown.

    How to use Moto X Play as Modem through USB tethering

    • First connect your Moto X play to your Laptop/Desktop through USB cable.
    • It needs drivers to be installed. If you are connecting for the first time, Windows on your system will install the required drivers.
    • Now Go to settings->More…->Tethering & mobile hotspot.
    • Enable the USB tethering.

    How to use Moto X Play as Modem through Bluetooth Tethering

    • First you need to pair your Moto X Play with your Bluetooth enabled Laptop/Desktop.
    • Once paired, go to settings->More…->Tethering & mobile hotspot.
    • Enable the Bluetooth tethering.
     The above method using Moto X play through USB tethering works well on Windows 8.1 or later systems. However, by default Android doesnot support tethering for Apple’s OS X platform.  So if you want to enable USB tethering with Apple Mac systems you need to thirty party application. There may be many USB Tethering driver for Mac. The one which I have used and worked well is HoRNDIS which is developed by  Joshua Wise. You can download USB tethering driver for Mac from the link here.
  • How to Take Screenshot on iPhone 6s and iPhone 6s Plus

    iPhone 6s or iPhone 6s Plus are the two new smartphones launched recently with iOS 9 OS. Both these smartphones offer lot of great features such as 3D touch, 4K video recording etc. It is powered by latest 64 bit A9 chip. If you are looking for how to screen capture or print screen on your new iPhone, then here is the guide on how to take screenshot on iPhone 6s and iPhone 6s Plus.

    Take screenshot on iPhone 6S Plus

    How to take screenshot on iPhone 6s and iPhone 6s Plus

    For taking screenshot on iPhone 6s or iPhone 6s Plus, there are 2 different methods available.

    Method 1: Taking screenshot using Sleep/Wake or Power button and home buttons

    • Press and Hold Sleep/Wake or Power button which is placed in the right side of the device.
    •  Without releasing the Power button, press Home button.
    • The screen will flickr and screenshot will be saved.

    Method 2: Taking screenshot on iPhone 6s and iPhone 6s Plus using  Assistive Touch feature

    Take screenshot using iPhone Assistive touch

    Taking screenshot using the Assistive Touch feature is very easy. If you are already enabled Assistive touch on your iPhone, then skip the below steps and directly move to next section.

    How to enable Assistive touch on iPhone 6s and iPhone 6s Plus

    • Go to Settings->General->Accessibility.
    • Scroll down till you find Assistive touch.
    • Move the slider to right to enable it.

    Taking screenshot on iPhone using Assistive touch

    • Tap on to floating assistive touch menu on the screen.
    • Tap on to Device.
    • In this screen, select More.
    • Now tap on to Screenshot.
    • Screen will flash and screenshot will be saved.

    Where taken screenshots on iPhone gets Saved?

    You can access taken screenshot in  Photos-> Recently added photos.

    Taking screenshot using Sleep/Wake or Power button and home buttons works on all the previos iPhons such as iPhone 4, iPhone 4s, iPhone 5, iPhone 5s etc. But assitive touch method of taking screenshot works with only latest versions of iOS. For turning on Assistive touch another simple method is to Tell Siri “Turn on AssistiveTouch.” .

  • How to use Samsung Galaxy J5 and J7 as Modem

    Samsung Galaxy J5 and Galaxy J7 are two mid range Android smartphone which offers good features in affordable price.  The AMOLED screen is the additional attraction of these smartphones. The Android version and UI are identical. In this post, we will learn to use Galaxy J5 and Galaxy J7 as modem through personal WiFi hotspot and USB tethering.

    WiFi Hotspot and USB tethering are two popular methods to share internet from smartphone to PC or other WiFi enabled devices. So in this post, let us explore the two different methods to share internet from Galaxy J5 and Galaxy J7 to other devices.

    Other Related Tips:

    How to take screenshot on Samsung Galaxy J5, J7 and J2.

    How to download PC suite for Galaxy J5, J7, J2

    How to use Samsung Galaxy J5 and  Galaxy J7  as Modem

    For using Samsung Galaxy J5 and  Galaxy J7 as modem to connect to internet from PC, Laptop or iPad, there are 3 different methods. The methods are Personal WiFi hotspot, USB tethering and Bluetooth tethering. You can use any of these methods according to your requirement. For using this Samsung Galaxy smartphone as modem, you need to have a data plan for tethering. The charges might apply as per your cellular network provider.

    How to use Samsung Galaxy J5 and  Galaxy J7 personal Wi-Fi Hotspot

    Samsung Galaxy personal Wi-Fi hotspot is the method through you can share your mobile data to other WiFi enabled devices through mobile hotspot.

    1. First enable the Mobile data.
    2. Now go to Apps->Settings.
    3. Tap on to Tethering and Mobile hotspot.
    4. Now Select Mobile Hotspot.
    5. Here you can enable the WiFi hotspot by moving the slider to right.
    6. You can access your mobile WiFi hotspot from any other wifi enabled devices using the SSID and password you have provided while configuring the Mobile Hotspot.

    How to configure Mobile Hotspot/WiFi hotspot in Galaxy J5 and  Galaxy J7

    • Follow the steps till 6 and then tap on to Menu Button(|)
    WiFI hotspot password reset
    • Tap configure hotspot.
    • In this page, you an enter or edit the network SSID, password  and security type.
    • Once down tap on to Save.

    Video Guide on how to use Galaxy J5 & Galaxy J7 as Wi-Fi Hotspot

    Video guide on how to use Samsung Galaxy J5 and Galaxy J7 as modem

    How to use USB tethering on Samsung Galaxy J5 and Galaxy J7

    • Connect your your device to PC through USB cable.
    • Install the required drivers. If any difficulty in installing the USB the driver for Galaxy J5 or J7, download and install Samsung Kies.
    • Follow the steps 1 to step 4 mentioned above.
    • Enable the USB tethering by moving the the slider right.
    • Your USB connected device will start getting the internet.

    How to use Bluetooth tethering on  Samsung Galaxy J5 and Galaxy J7

    • First you need to pair your smartphone with device which you want to connect to internet.
    • Then follow the steps 1 to 4.
    • Now enable the Bluetooth Tethering.

    These are the different ways of  accessing net from pc through Samsung Galaxy J5, Galaxy J7, Galaxy J2.

    Note:

    Using  Samsung Galaxy J5 and Galaxy J7 as WiFi hotspot, will drain your battery faster. So use this feature wisely.

  • How to take screenshot on Lenovo VIBE P1m

    Lenovo VIBE P1m is a newly launched Dual sim Android smartphone. The main USP of this smartphone is its 3900 mAh battery. The other features of the device are 1 GHz MediaTek MT6735P 64-bit Quad Core Processor, 2GB RAM, 16GB internal storage, 5 inch 720p display screen and 4G LTE. In this post we will learn to perform printscreen/screencapture on Lenovo VIBE P1m.

    Lenovo VIBE P1m is runs on Android 5.1 Lollipop along with VIBE UI. VIBE UI offers lot of customisation and useful features. Like any other Lenovo smartphone, in VIBE p1m too we have 2 methods of taking screenshot. So lets explore the different ways to capture screen on Lenovo VIBE P1m.

    Take screenshot on Lenovo Smartphone

    How to take screenshot on Lenovo VIBE P1m

    Method 1: Default Android or Power button+ Volume down Key: This is the standard method which works on all latest Android smartphones. For taking screenshot using this method follow the step given below.

    1. Go to the screen on which you want to take screenshot.
    2. Press and hold volume down and power button simultaneosly.
    3. The screenshot will be taken.
    4. The taken screenshot will be saved on Gallery->Screenshot folder.

    Method 2: Using the quick settings option

    Like we have seen on Lenovo A6000 and Lenovo K3 Note, on VIBE P1m also we can take the screenshot using quick settings options. For using this method of screen capturing, follow the steps given below.

    • Go to the screen on which you want to take screenshot.
    • Access the quick settings option by swiping down the screen.
    • In quick settings, you will find Screenshot icon.
    • Tap on to it. Screeenshot will be taken.
    • Taken screenshot will be saved on Gallery->Screenshot folder.

    Lenovo VIBE P1m currently available only on flipkart in India. The price of this device is Rs.7,999. Normally you need to register and buy this Lenovo smartphone from flash sale. But on Diwali offer, this smartphone is available on open sale.

    Video Guide on How to take screenshot on Lenovo Smartphones