Category: How To Guides

List of simple tips and tricks of Smartphone, gadgets and browsers. These includes Tethering of smartphones, Enabling WiFi Hotspots, Browser optimisation, Tips and Tricks on Browsers etc.

  • How to take screenshot on Samsung Galaxy A80

    Capturing a screenshot is a simplest yet highly useful feature of any smartphone. Each company provides different additional options apart from the default android method to make the screenshot process more powerful and useful. You can capture a screenshot in Galaxy A80 using multiple ways.

    Samsung Galaxy A80 provides tool to take scroll screenshot and make quick edits. Here is the different methods to capture screenshot.

    Different ways to take screenshot on the Samsung Galaxy A80

    You may like to read:

    Samsung Galaxy A80 Top 5 Features

    Screenshot on Samsung Galaxy A80

    Button combo screenshot

    This is the most common way of capturing screenshot on any Android phone.

    • Open the page you want to capture.
    • Press and hold Volume down and power button simultaneously for around 2 seconds.
    • The screen will shrink in and editing options will appear briefly on the screen.
    • You can edit or share instantly from here,
    • Alternatively you can open the screenshot from Gallery>>Albums>>Screenshot.

    Palm swipe screenshot

    Samsung also provides another method through gestures.  Swiping the hand across the screen will capture the screenshot.

    • Go to Settings->Advanced features-> Motions & Gestures.
    • Ensure “Palm swipe to capture” enabled.
    • Open the content on the screen you want to take screenshot.
    • Place the side of the palm of your hand on the edge of the screen, and in one motion swipe it across the face of the phone.
    • The screenshot will be saved in the same way as mentioned in the first method. You will also get the same editing and sharing options at the bottom of the screen.

    Scrolling capture

    Scrolling screenshot is useful for taking screenshot of multiple pages.

    • Go to the page you want to take screenshot.
    • The page you have opened must be able to vertically scroll. Remember to start this process at the top of what you want to screenshot, since the scroll only goes downward.
    • Use Button combo or Palm swipe to take screenshot.
    • Tap scroll capture(Arrow Down marker covered in square bracket) at the bottom of the screenshot edit menu.

    This concludes our tutorial capture screenshot in Samsung Galaxy A80.

    Video Guide to screenshot on Galaxy A80

    The video is done in Galaxy A30. However, the method is identical to Galaxy A80.

  • How to take screenshot in Motorola One Vision

    Motorola One Vision is the third phone from “Motorola One” family which runs on Android One platform. It has near stock version of Android. Even though it runs on near stock Android, Motorola added few useful customisation. It includes additional way of taking screenshot. So in this post, we will cover how to take screenshot in Motorola One Vision.

    Motorola One, Motorola One Power are the two other phones from “Motorola One” family. Motorola One Action and Motorola One Pro are the two phones which is expected to launch in the coming months.

    Take screenshot in Motorola One Vision- 3 Different Methods

    Take screenshot in Motorola One Vision

    Take screenshot using Hardware Keys

    This is one of the easiest and common method available on Android phones.

    • Go to desired screen.
    • Press and Hold Volume down and power button simultaneously.
    • This will save screenshot.

    Take screenshot using the Three Finger Touch Method

    This method is part of the featured added under Moto Actions. To enable this method, you need to enable this feature. For that,

    • Browse to Settings>> Features > Moto Actions.
    • Enable Three Finger screenshot and Screenshot editor.

    For taking the screenshot,

    • On a page you want to capture screenshot, just touch the screen with three fingers.
    • It will take screenshot.

    Capture screenshot using screenshot button

    For using this method,

    • Navigate to the page you want to take screenshot.
    • Press and hold power button.
    • You will get options in the screen. Select the “Screenshot“.
    • Screenshot will be captured.

    How to take scroll or long screenshot in Motorola One Vision

    • Take screenshot using any of the above mentioned methods.
    • Touch the double down arrow to scroll and capture.
    • To stop scrolling before the end of the page, touch STOP.

    Where to access taken screenshot?

    You can access the taken screenshot from Photos>>Device folders >> Screenshots.

  • How to download Videos and Photos from WhatsApp Status

    Whatsapp is one of the most popular cross-platform messaging app. Apart from messaging, it also provides option to share photos, videos and GIF’s as status update. This will be visible for 24 hours unless it is deleted. If you like your friends status video or image, is there any way to download and save it on your phone? Here is the guide to download and save WhatsApp status video and images to your Android phone.

    There is no straight way to download whatsApp status videos. One of the way to save WhatsApp Status image is taking screenshot. However, quality of images may not be as good as the original. If the status has videos or GIF, screenshot method will not work.

    Note: Please get the consent from the user who uploaded the status before downloading it.

    You may like to read:

    How to download WhatsApp Status Video and Images to Android phone

    Time needed: 5 minutes

    Here is the steps by step guide to download WhatsApp Status Videos and Images.

    1. Get the File Manager

      Many Android OEM’s such as Samsung, Oppo, Vivo, OnePlus etc provide file manager out of the box. You can search the app “File Manager” or “File explorer” etc if you are not sure on where is the File manager. If your phone does not have File Manager, you can get good file manager such as Google “Files” or ES File manager etc.

    2. Go to Setting in File Manager

      Settings option placement are different on different phones. In Samsung File Manager, you can find it in the menu which is right top corner.(Three vertical dots). In Google Files manager, it is there is left top corner.

    3. Enable the “Show Hidden Files.”

      You need to enable the option to show hidden files.

    4. Go to “Internal storage>WhatsApp>Media>Statuses”

      Open File manager and go to Internal storage. Then find folder named WhatsApp. Then navigate to Media and then Statuses.

    5. All the status that you have viewed will be shown in the folder.

    6. Select the Video and Images to save.

      You can select individual app or multiple video or images. Just long press on the media file, select the files you want to save.

    7. Save to storage

      If you are using Google Files Manager, Go to Options(Top right corner) and select “Copy to”. Then browse to the folder where you want to save the media file.

    Depending on the file manager you use, options layout and naming may be different. But the procedure is more or less same.

    We reiterate, please keep the person informed if you are saving or sharing their WhatsApp image or Video.

  • Transfer Data From An Android To OnePlus 7 or OnePlus 7 Pro

    You might have already purchased or thinking of buying a new Oneplus 7 or OnePlus 7 Pro. One of the main thing while upgrading the smartphone is how to transfer data from old phone to new one. In this post we will cover how to transfer data from other Android phone to OnePlus 7 or OnePlus 7 Pro.

    If you are already using older version of OnePlus phones such as OnePlus 3, Oneplus 3T, OnePlus 5, OnePlus 5T, OnePlus 6 or OnePlus 6T, it is very easy to transfer data to latest OnePlus 7 or OnePlus 7 Pro.

    OnePlus Switch is an app which helps to transfer data from any Android phone running on Android 5.0 or higher to OnePlus 7 or OnePlus 7 Pro. Users can transfer data between the phones using the WiFi hotspot. If you are OnePlus user, then you can even transfer launcher and launcher customisations. For now, only OnePlus launcher is supported.

    You may like to read:

    Transfer Data From An Android To OnePlus 7 or OnePlus 7 Pro

    Here is the step by step guide to migrate data from Android phone to OnePlus 7 or OnePlus 7 Pro.

    Time needed: 15 minutes

    Steps to migrate data from Old OnePlus phone to OnePlus 7 or transfer data from other Android phone to OnePlus 7 Pro.

    1. Install OnePlus Switch App on Old Android or OnePlus phone

      Go to Google Play store. Search OnePlus Switch. Install the app on your old phone.

    2. Open OnePlus Switch App in OnePlus 7 or OnePlus 7 Pro.

      If it is not installed, install it from Playstore.

    3. Launch OnePlus Switch App on old phone.

      If your old device is OnePlus phone then select “I’m an Old Phone”.

    4. Scan the QR code of OnePlus 7 from old phone.

      You need to provide full permission to OnePlus Switch App. Then scan the QR code showing in new phone OnePlus switch App from old phone OnePlus Switch app.

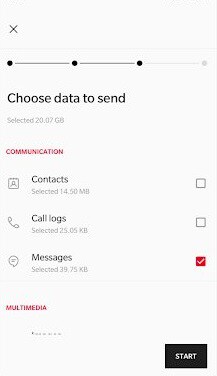
    5. Select the Data to transfer

      You can choose the data you want to transfer from old phone to new one.
      Transfer data from Android to OnePlus 7

    6. Tap on Start

      Data migration will start. Depending on the size of the data transfer, timings will vary.

    7. Data migration from Old phone to new phone complete

      Now you can access all the migrated data in new OnePlus 7 or OnePlus 7 Pro.

    Summary of Data migration from Android phone to OnePlus 7 or OnePlus 7 Pro

    Data migration from old Android phone to OnePlus 7 or OnePlus 7 Pro is easy. If your upgrading from older OnePlus phone, then you can even migrate Launcher and its customisations. OnePlus Switch can transfer installed apps as well. However, we felt it is better not to transfer apps via OnePlus Switch. Because, we faced issues in updating the apps.

  • How to take screenshot on Galaxy A70 and Galaxy A30

    Samsung Galaxy A70 and Galaxy A30 are the two popular smartphones in different price segment. Both runs on Android 9.0 with latest OneUI. In this post we will cover different ways to take screenshot in Galaxy A70 and Galaxy A30.

    If you want to take screenshot in Galaxy A70 or take screenshot in Galaxy A30, there are many ways available. In this post, we will cover 3 different ways to capture screenshot in Galaxy A70 and Galaxy A30.

    Different ways to take screenshot in Galaxy A70 and Galaxy A30

    Three methods to perform Galaxy A70 screenshot are Hardware keys method, Palm Swipe method and Assistive button method.

    How to take screenshot in Galaxy A70 and Galaxy A30 using Hardware keys

    • Navigate to the screen on which you want capture screenshot in Galaxy A70 or Galaxy A30.
    • Press and Hold Volume Down and Power Button simultaneously.
    • Screenshot will be saved.

    How to take screenshot on Samsung Galaxy A70 and Galaxy A30 using Palm Swipe Method

    Galaxy A70 palm swipe screenshot
    • Ensure Palm Swipe gesture enable. You can do that by going to Settings->Advanced features->Motions & Gestures. Enable Palm Swipe to capture.
    • On the screen you want to perform print screen, swipe the edge of your hand across the screen.
    • The screenshot will be saved in Gallery->Screenshot folder.

    How to take screenshot in Samsung Galaxy A30 and Galaxy A70 using Assistive Menu

    • Enable Assistant Menu by going to Settings->Accessibility->Dexterity and interaction. Toggle on Assistant menu.
    • Assistant menu will be appear in the screen. You can move it wherever you want.
    • Now, on a page you want to capture screenshot, tap on Assistant menu ->Screenshots.
    • Screenshot will be saved.

    Galaxy A70 and Galaxy A30 screenshot methods Summary

    These are the three methods to take screenshot on these device. There are other methods as well. However, these three methods are commonly used. Which method you use to take screenshot?