Category: Uncategorized

  • Samsung Galaxy Forever: How to Own the S26 Ultra for 50% Less

    Let’s be honest: we all want the latest tech, but the price tags on premium flagships can feel like a steep mountain to climb. Samsung India just changed the game.

    With the launch of Galaxy Forever, Samsung is tearing down the barriers to owning its most powerful devices. If you’ve had your eye on the Galaxy S26 Ultra or S26 Plus, you can now take one home by paying only half the cost over the first year.

    Here’s everything you need to know about this industry-first ownership model.


    What is Galaxy Forever?

    Galaxy S26 Ultra

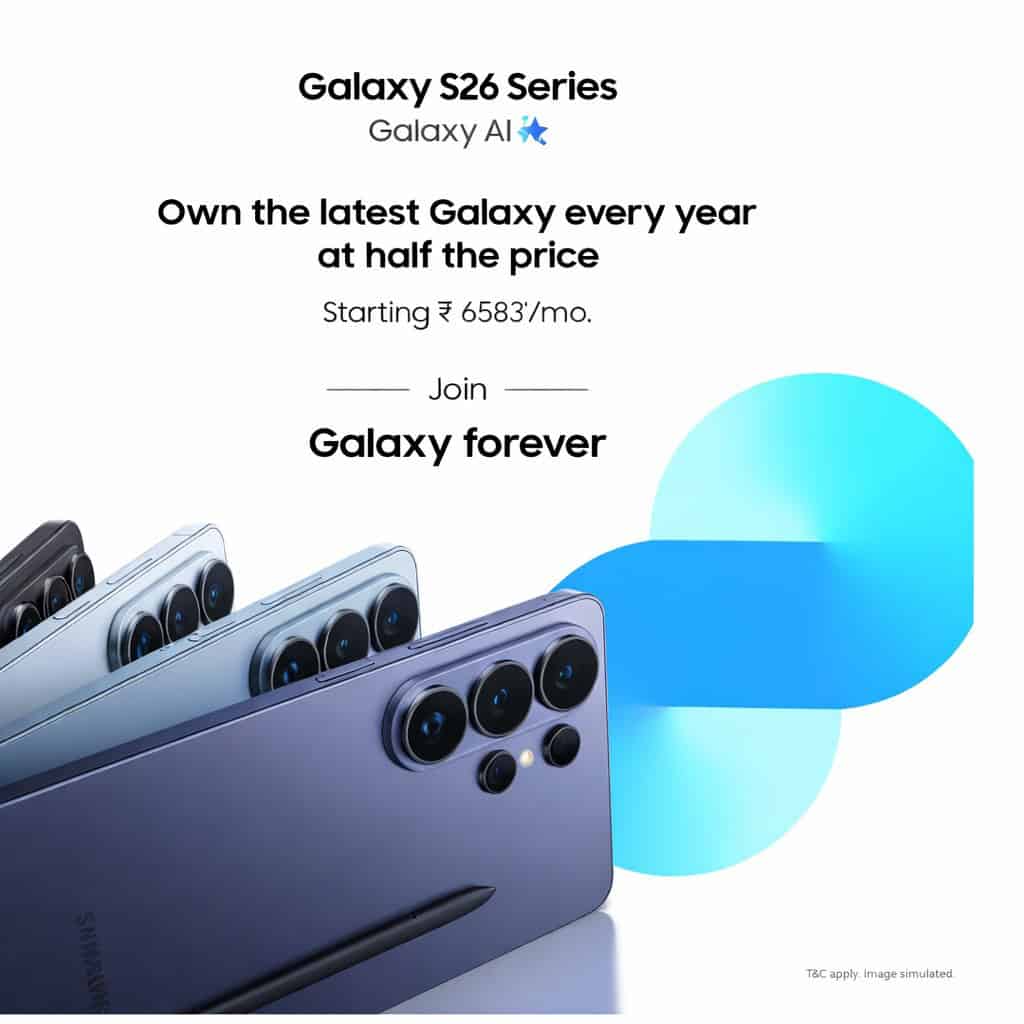
    Galaxy Forever isn’t just another EMI plan; it’s a flexible “subscription-style” model for your phone. Instead of committing to the full price upfront, you pay for 50% of the device over 12 months.

    When that year is up, you get the ultimate power of choice: Return, Retain, or Upgrade.

    The “No-Questions-Asked” Flexibility

    The standout feature here is the freedom you have after 12 months. Samsung has partnered with Samsung Care+ to ensure that when they say “no questions asked,” they mean it.

    • Upgrade: Ready for next year’s flagship? Simply hand back your S26 and move to the latest model.
    • Retain: Love your phone too much to let go? Just pay the remaining 50% via another 12 no-cost EMIs.
    • Return: Done with the device? Return it and walk away with 50% assured buyback value already settled.

    Breaking Down the Costs

    Samsung is making the “Ultra” life surprisingly affordable. Here is how the monthly breakdown looks for the new flagship series:

    DeviceStarting PriceMonthly Device EMI (12 Mo)Programme FeeTotal Monthly Payable
    Galaxy S26 UltraINR 1,39,999INR 5,833.29INR 749.92INR 6,583.21
    Galaxy S26 PlusINR 1,19,999INR 4,999.96INR 749.92INR 5,749.88

    Pro Tip: The programme fee includes Samsung Care+ (worth INR 13,999), covering accidental and liquid damage with zero deductibles. It’s essentially “peace-of-mind” insurance built into your monthly payment.


    Why This is a Win for Indian Consumers

    Beyond the lower monthly payments, Samsung is focusing on financial inclusion.

    1. Samsung Finance+: For those without a credit card, Samsung Finance+ offers easy credit with minimal documentation and quick approvals.
    2. Corporate & Student Perks: Are you a student or a corporate employee? You can access these benefits through the Samsung Student+ and Corporate+ stores for even more exclusive edges.
    3. Widespread Availability: You don’t have to hunt for this deal. It’s available on Samsung.com and across 1,500+ Samsung Experience Stores nationwide.

    The Verdict: Is it worth it?

    If you’re the type of user who likes to stay at the cutting edge of mobile photography and AI features, Galaxy Forever is a no-brainer. It treats your smartphone more like a service than a debt, giving you the latest tech today without the multi-year financial hangover.


    Ready to hold the future in your hands? Would you like me to help you find the nearest Samsung Experience Store or compare the S26 Ultra specs to see if it’s the right upgrade for you?

  • OnePlus 15R Setup Guide: Step-by-Step for Beginners (2026)

    Congratulations on your new OnePlus 15R! Whether you are a long-time Android user or switching from an iPhone, the first few minutes with your device are crucial. In this tech2touch guide, we will walk you through the complete out-of-the-box setup process to ensure your smartphone is ready for peak performance.

    If you prefer a visual guide, you can watch our full step-by-step video here: OnePlus 15R Setup Video by tech2touch.


    Step 1: Powering on the Dragon’

    To begin, locate the power button on the right side of your device. Long-press it until you see the iconic OnePlus logo. After a few seconds of animation, you will be greeted by the “Never Settle” welcome screen.

    • tech2touch Tip: Ensure your device has at least 30% battery before starting the setup to avoid any interruptions.

    Step 2: Language and Region Selection

    Tap the right arrow to start.

    1. Select Language: Choose your preferred language (English, Hindi, or other regional languages).
    2. Select Region: Choose your country (e.g., India) and tap Next.
    3. Legal Information: Review the User Agreement and Privacy Policy. Tap Agree to continue.

    Step 3: Connectivity & Data Transfer

    Next, you will reach the “Setup using another device” screen.

    • Fresh Start: At tech2touch, we usually recommend a fresh setup for a cleaner experience. Tap Skip.
    • Connect to Wi-Fi: Select your network and enter your password. This is essential for downloading system updates and Google services.

    Step 4: Google Services and Security

    The OnePlus 15R runs on OxygenOS 16 based on Android 16.

    • Google Account: Sign in to your Gmail to sync your contacts, photos, and Play Store apps.
    • Screen Lock: We highly recommend setting up a Fingerprint or Face Unlock immediately to keep your data secure.

    Step 5: Final Customization (Buttons vs. Gestures)

    One of the best parts of the OnePlus 15R is the customization. You will be asked to choose your navigation style:

    • Buttons: The classic “Back, Home, Recent” buttons at the bottom.
    • Gestures: A modern, full-screen experience using swipes.

    Once you’ve made your choice, tap “Let’s Go” to enter your home screen!


    Frequently Asked Questions (FAQ)

    1. Does the OnePlus 15R come with a charger?

    Yes! In our tech2touch unboxing, we confirmed the box includes an 80W SUPERVOOC fast charger and the signature red cable.

    2. How do I take a screenshot on the OnePlus 15R?

    The easiest way is to swipe down with three fingers on any screen. For more advanced methods, check out our dedicated OnePlus Screenshot guide on tech2touch.com.


    Stay Connected with tech2touch

    Found this guide helpful? Make sure to follow tech2touch across social media for more OnePlus tips, tricks, and hidden features!

  • HP India Launches New High-Speed Laser M300 Series Printers for SMBs and Enterprises

    HP India has expanded its Laser M300 Series with three new models—HP Laser 335dn, HP Laser 335dw, and HP Laser MFP 355sdnw—designed for fast-growing SMBs, print shops, and enterprises. The new printers offer 33 ppm auto-duplex printing, lower running costs, and a compact, energy-efficient design ideal for Indian businesses.

    Key Features of the New HP Laser M300 Series

    1. High-Speed, High-Volume Performance

    • Up to 33 ppm (A4) printing
    • Automatic duplex printing across all models
    • 8.5-second first-page-out time
    • 600 MHz processor + 256 MB memory
    • 250-sheet input tray for large print jobs

    2. New Separate Drum & Toner System

    HP introduces its first separate drum and toner system in the A4 commercial segment:

    • HP 181A/181X toners: up to 3,000 pages
    • HP 181A imaging drum: up to 10,000 pages
    • Lower cost per page and reduced downtime

    3. Smart, Connected Printing

    • Wireless and Ethernet (335dw & 355sdnw)
    • Mobile printing support via HP App
    • 40-sheet ADF on MFP 355sdnw for easy scanning and copying
    • Space-saving all-white design

    4. Sustainable & Energy Efficient

    • Made with 20% recycled plastic
    • Certified for energy efficiency

    Price and Availability in India

    Available on the HP eStore:

    • HP Laser 335dn – ₹24,000
    • HP Laser 335dw – ₹25,500
    • HP Laser MFP 355sdnw – ₹37,875

    Conclusion

    The new HP Laser M300 Series delivers faster printing, lower operating costs, and modern connectivity—making it one of the best laser printer choices for SMBs, enterprises, and print shops in India.

  • How to Set Custom Notification Sounds for ANY App on Samsung Galaxy A16 5G

    Ever get tired of hearing the same old notification sounds on your Samsung Galaxy A16 5G? Want to add a personal touch and make sure you never miss an important alert? Well, you’re in luck! In this guide, we’ll show you how to set custom notification sounds for any app on your phone.

    Recommended reading:

    Steps to Set Custom Notification Sounds on Galaxy A16 5G

    1. Enable Notification Categories:
      • Go to Settings > Notifications > Advanced Settings.
      • Enable “Manage notification categories for each app.”
    2. Choose an App:
      • Go back to Notifications > App Notifications.
      • Select the app you want to customize.
    3. Customize the Sound:
      • Tap on Notifications > Notification categories.
      • Select the type of notification you want to customize (e.g., Incoming messages, Mail, Calls).
      • Tap on Alert > Sound.
      • Choose a sound from the list or select “Custom” to use a custom audio file.

    Additional Tips:

    • You can also download custom notification sounds from the internet and save them to your phone’s storage.
    • To delete a custom sound, select it and then tap the trash can icon.
    • You can assign different sounds to different notification categories within the same app.

    Benefits of Custom Notification Sounds:

    • Personalization: Make your phone unique and easily identify which app is sending you a notification.
    • Importance: Use different sounds for important notifications to ensure you don’t miss them.
    • Accessibility: For users with hearing impairments, custom sounds can be helpful for distinguishing between different types of notifications.

    Conclusion

    Customizing notification sounds is a simple way to add a personal touch to your Samsung Galaxy A16 5G and make sure you never miss an important alert. Follow these easy steps and enjoy the ability to personalize your phone’s notifications!

    Video Guide on how to set custom notifications sound for Apps in Samsung Galaxy A16 5G

  • How to switch off iPhone 16 Pro or iPhone 16 Pro Max

    Ever get that “need to restart” feeling with your shiny new iPhone 16 Pro or Pro Max? Apple’s made it super easy to power down, and today I’m going to cover how to switch off iPhone 16 Pro or iPhone 16 Pro Max using three different methods.

    How to turn off iPhone 16 Pro or iPhone 16 Pro Max

    Method 1: The Classic Button Combo

    This one’s for the old-school iPhone users (like me!).

    • Step 1: Press and hold the Side button and either the Volume Up or Volume Down button simultaneously.
    • Step 2: Keep holding those buttons until the “slide to power off” screen appears.
    • Step 3: Slide that power icon to the right, and your iPhone will shut down.

    To turn it back on, just press and hold the Side button until the Apple logo graces your screen.

    Method 2: Control Center Quick Shutdown

    iOS 18 and later have this nifty trick up their sleeve:

    • Step 1: Open your Control Center (swipe down from the top-right corner of the screen).
    • Step 2: Spot that little power icon? Tap and hold it.
    • Step 3: The “slide to power off” option will pop up. Slide to shut down!

    Method 3: Using Siri

    For the hands-free approach, Siri’s got your back:

    • Step 1: Activate Siri (say “Hey Siri” or long-press the Side button).
    • Step 2: Simply say “Power off my iPhone.”

    If you prefer typing, double-tap the bottom edge of your screen to bring up the keyboard, then type “Power off.” You’ll get a confirmation prompt before your iPhone shuts down.

    Bonus Tip: If your Side button isn’t working, don’t panic! Plug your iPhone into a charger using a USB cable. It’ll restart automatically.

    That’s it! Three simple ways to turn off your iPhone 16 Pro or Pro Max. Hopefully, this helps you out. Don’t forget to share this with your friends and leave a comment if you have any other cool iPhone tips!