
Samsung has officially expanded its popular A-series lineup in India with the launch of the Samsung Galaxy A27 5G. Designed specifically to cater to younger consumers, this smartphone blends a sleek design, robust performance, long-term software support, and a comprehensive suite of advanced AI features into a highly competitive price bracket.
The smartphone will hit shelves on July 3, 2026, offering buyers cutting-edge tech alongside attractive zero down-payment EMI plans and instant cashback incentives.
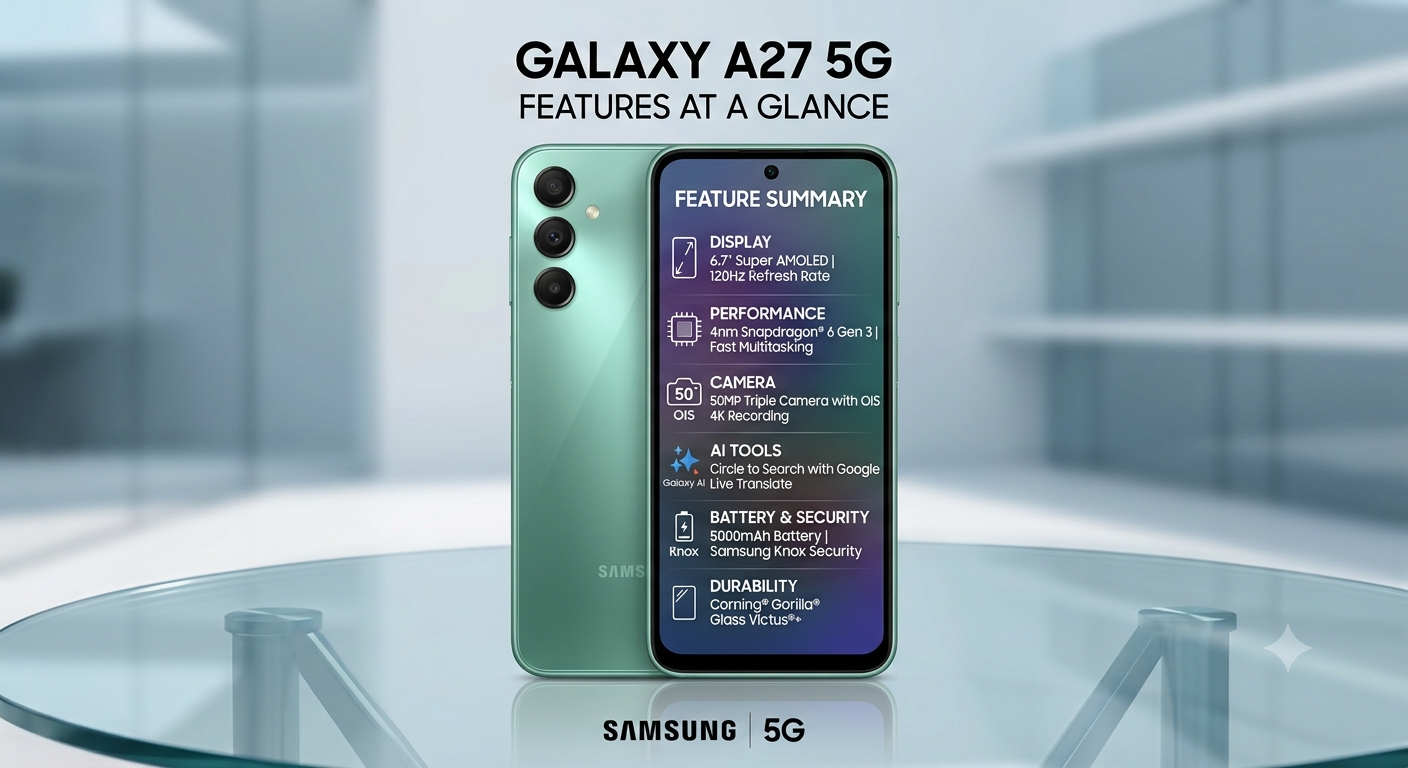
Core Specifications of the New Samsung Galaxy A27 5G
1. Immersive 120Hz Super AMOLED Display
The Galaxy A27 5G features an enhanced 6.7-inch Super AMOLED display with a fluid 120Hz refresh rate, ensuring vibrant color reproduction and razor-sharp clarity for media consumption and gaming.
- Infinity-O Design: The screen incorporates a minimized camera hole punch to deliver a highly immersive viewing experience.
- Premium Protection: To safe-guard against drops and scratches, the front is reinforced with Corning® Gorilla® Glass Victus®+.
2. Powerful Hardware and Seamless Multitasking
Under the hood, the device is powered by an ultra-efficient 4nm Snapdragon® 6 Gen 3 mobile platform, complemented by advanced LPDDRX5 RAM and fast UFS 3.1 internal storage.
- Enhanced GPU: Upgraded graphics acceleration provides lag-free gaming, smoother UI animations, and fast data transfer speeds.
- Effortless Processing: The combination allows users to seamlessly jump between resource-heavy applications, browse content-heavy web pages, stream 4K videos, and deploy on-device AI tools simultaneously.
3. Advanced AI-Powered Triple Camera System
Photography enthusiasts will appreciate the hardware and software synergy built into the triple-lens array. The phone houses a 50MP primary sensor with Optical Image Stabilization (OIS) and 4K video recording, paired with a macro camera and an ultra-wide angle lens capable of capturing a 115° field of view. The high-resolution system outputs images up to 300dpi, making them ideal for high-quality physical prints. On the front, a 12MP HDR camera ensures evenly exposed selfies and clear video calling.
The camera experience is further bolstered by built-in Samsung AI tools:
- Object Eraser: Instantly delete unwanted objects or backgrounds from pictures.
- Edit Suggestions: Automatically analyzes photographs and suggests optimized adjustments.
- My Filter: Allows users to copy and duplicate color profiles or styles from other images onto their own shots.
4. Smart Productivity and Galaxy AI Tools
The device comes deeply integrated with smart tools designed to assist in daily tasks:
- Circle to Search with Google: Allows users to quickly look up items on their screens via multi-object recognition.
- Voice Transcription: The Voice Recorder app transcribes and translates audio in real-time across 22 languages—making it ideal for capturing corporate meeting notes.
- AI Engine Support: Deeper systemic integration with tools like Google Gemini and Perplexity across domestic Galaxy applications like the Gallery.
- Live Transcription: Translates or transcribes phone calls and voicemails instantly into English, Hindi, and Gujarati.
- Bixby: Serves as the central on-device agent, operating key settings and tasks through natural language processing.
5. Massive Battery, Enterprise Security, and Unmatched Software Longevity
- Battery & Power: Packaged with a long-lasting 5000mAh battery that supports fast charging to comfortably manage a full day of heavy usage.
- Industry-Leading Support: Samsung is promising 6 generations of Android OS/One UI updates alongside 6 years of security patches, keeping the device fresh and relevant into the next decade.
- Knox Vault Protection: Fortified by Samsung Knox and Knox Vault hardware security architectures to safeguard private photos, secure documents, and personal details.
- Samsung Wallet: Fully integrated for contactless Tap-to-Pay, UPI payment integration, and the secure storage of digital IDs or travel documentation.
Samsung Galaxy A27 5G Price in India and Launch Offers
The Samsung Galaxy A27 5G is available in three striking finishes: Light Green, Light Pink, and Black. It will be sold across official Samsung Exclusive Stores, retail partner outlets, Samsung.com, and prominent online marketplaces.
Every model qualifies for an immediate ₹3,000 multi-bank and UPI cashback discount. Additionally, flexible consumer financing options include zero-down payment schemes lasting up to 15 months, or an extended 24-month EMI layout featuring an 8-month down payment via chosen non-banking financial institutions (NBFCs).