

Author: Aniruddh

  • OnePlus 3 Tips and Tricks With FAQ

    OnePlus 3 comes with great features at attractive price tag. With Oxygen OS which is based on Android Marshmallow, you  have lot of features to customise your device. Here are some of the OnePlus 3 Tips and Tricks in the form of FAQ.

    OnePlus 3 Tips and Tricks

    Recommended Reading:

    Le Max 2 Features and FAQ

    OnePlus 3 Tips and Tricks

    What are the different gesture controls available on the OnePlus 3? How to enable it?

    It offers 4 different types of gesture controls. The details are given below.

    • Double tap to wake: Tap the screen twice to wake the device.
    • Open camera: Draw “O” on the screen to open the camera.
    • Toggle Flashlight: Draw a V on screen to toggle flashlight.
    • Music Control: Draw “||” with two fingers to play or pause music. Draw “<” or “>” to previous or next.

    You can access this settings from Settings->Gestures.

    How to customise LED notification light in OnePlus 3?

    You can customise Notification light colors by going to Settings->Customisation->LED notifications.You can select different colours for Global notifications, Battery full, Battery low or Battery charging.

    What are the different navigation bar customisation options available on OnePlus 3?

    There are many customisation options available for customising navigation bar. You can access it from Settings->Buttons.

    1. On-Screen navigation bar: Using this option you can toggle between onscreen software navigation bar or hardware capacitive touch button navigation bar.
    2. Swap buttons: This allows you to swap the recent and back buttons.
    3. Backlight: This allows you to toggle between capacitive key backlight LED turn off or on.

    Apart from this, you can assign different task to home, recent and back buttons for below actions.
    Long press action & Double tap action: You can assign task such as opening Recents, Search assistant, Turn off screen , open camera, Open voice search, Open last used app and Open shelf for these action for each buttons.

    How to enable power button to end call function in OnePlus 3?

    Go to Settings->Accessibility. Here you can enable power button to end call option.

    How to customise quick toggle menu buttons?

    For customising the quick toggle buttons, go to quick toggle menu and tap on to edit button. Now you can move quick toggle buttons according your requirement. You can also remove or add quick toggle buttons by tapping on it.

    What are OnePlus 3 camera tips and tricks?

    OnePlus 3 comes with Manual camera mode which allows you to tap to focus, set the exposure point etc. For accessing this setting, launch the camera app, swipe left for modes and select manual mode.
    Volume keys as shutter button: You can use shutter button to shoot the picture and to start or end video recording.

    You can enable double tap power button to Launch camera: To enable this, go to settings->Display. Now enable the Press power button twice for camera.

    How to take screenshot on OnePlus 3?

    The simple two method to take screenshot are default volume down+Power button method and Power button method.

    1. Default Android Volume down+Power button method
      • Go to the screen on which you want to take screenshot.
      • Press and hold volume down and power button at the same time.
      • Screenshot will be taken.
    2. Power button method
      • Go to the screen on which you want to take screenshot.
      • Now Press the power button.
      • In the options, select Screenshot. Screenshot will be taken.

    What are different ways to share mobile data from OnePlus 3 to PC or laptop?

    OnePlus 3 provide 3 different methods through which you can share the mobile data with other compatible devices. You can access these settings from Settings->More->Tethering & Hotspot.

    1. WiFi Hotspot: If you enable, you can make your OnePlus 3 as hotspot to connect other wifi enabled devices to internet using the mobile data of OnePlus 3.
    2. USB tethering: For enabling this, you need to connect the phone to PC/Laptop via USB cable.
      Now enable the USB tethering. It will start sharing the mobile data with Laptop or PC.
    3. Bluetooth Tethering: For to use this, first you need to pair your OnePlus 3 with laptop or desktop. Then enable the Bluetooth tethering.

    What are the other useful OnePlus 3 tips and tricks?

    • Left capacitive button long press- Shelf feature: The latest Android Marshmallow based Oxygen OS in OnePlus 3 has new feature called Shelf. You can access this feature by flicking your finger right across the home screen. This gives you the fast access to favorite contacts and apps, essential info and widget.
    • Swipe up for google now and swipe down for notifications.
    • Night Mode which you can access from the quick toggle menu.
    • Long press on toggle menu to go to settings: If you do long press on any of the quick toggle menu buttons, it will take you to relevant settings page.
    • Wave your hand to Ambient Display: This will give you an option to see lock screen notification by just waving your hand on the display.
    • Customise your Google search bar: Tap your right capacitive key, go to customize, swipe right on quick search and select the size of your search bar.

    These are only few OnePlus 3 tips and tricks. There are lot of customisation and features available on OnePlus 3. If you know other OnePlus 3 Tips and Tricks please share it in the comment section below.
  • Easy Duplicate Finder- Easy way to remove duplicates from Hard disk

    Nowadays, we get files, photos etc from multiple sources. Most of the times, we don’t even look for the duplicate entry while storing them. Over the time, these duplicate files starts to fill the hard disk. Manually finding and removing duplicate file is very difficult if files are more. So we have many softwares both freeware and paid ones to remove duplicate files. Easy Duplicate Finder is one of the such software which helps you to remove duplicate files from your hard disk.

    As mentioned before, there are abundant free duplicate removal  software available. So why one need to buy Easy Duplicate Finder by paying $39.95 for single computer license. What is the extra features you are getting for paying money. Let us find out more about Easy Duplicate Finder for windows.

    When I installed Easy Duplicate Finder on my Windows 10 laptop, I felt the interface is bit outdated. But then when I started working on it, I felt controls are easy to understand and use. It provides simple way to add folders or subfolders to scan, filter which file type to be included or excluded for duplicate check. It also provide option to limit scan, based on the file size range.

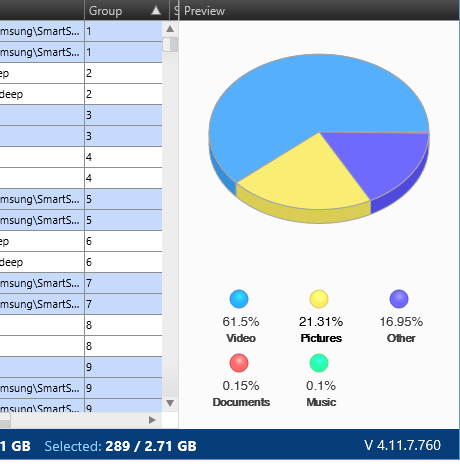
    To test the Easy Duplicate Finder, I ran the duplicate check scan on my external hard. The Easy Duplicate finder scanned close to 32,000 files which included photos, music, videos etc in around 5 minutes. Then I got a report with list of all files, with duplicates selected in the left side and summary in the form of Pie chart in the right side. You have the option to preview the duplicate files and select or unselect the one which you want to remove or retain. Even you can remove all the duplicates in single click.

    Easy Duplicate Finder

    Easy Duplicate finder does scan, searching inside compressed folders, looking at music tags and examining file contents etc. It is capable of removing duplicate emails and contacts from the outlook, duplicate tunes from iTunes library as well. It can also scan and remove duplicates from Google Drive, Dropbox etc.

    Summary: Easy duplicate finder is a very capable duplicate file removing software. It provides great control over what needs to be scanned and what need not be scanned. Is it worth buying the software at $39.95?. It depends. If your requirement really needs all the special features and full control, then it is worth. For simple file duplicate detection, you can use the free option version of Easy Duplicate finder. You can visit the home page of Easy duplicate finder by clicking here.

    Advantages and Disadvantages of Easy Duplicate Finder

    Pros:

    • Easy to understand interface and lot of options to choose.
    • Finds large number of duplicate in comparatively less time.
    • Option to move or rename duplicate files.
    • Detailed report with summary and file preview option before cleaning the duplicates.

    Cons:

    • $39.95 for a single computer license.

    Note: There is offer going on with this software. You can buy Easy Duplicate Finder and get Duplicate Photo Cleaner (a program to find similar and duplicate photos) plus an ebook for free. The upgrade link is here.

  • Moto G4 Tips Tricks and FAQ

    Moto G 4th Generation is the cheaper variant of Moto G4 Plus. It features same SoC and display panel. However, there is no fingerprint scanner in this variant. There is a change in camera module as well.  Here are few Moto G4 tips and tricks with FAQ.

    Moto G4 Tips and Tricks with FAQ

    Moto G4 Tips and Tricks with FAQ

    What is the price of Moto G4 in India? Where can I buy this smartphone?

    Moto G4 price in India is Rs.12,499. You can buy it from the amazon.in. You can directly go to the product page by clicking here.

    What are the different colour options available?

    It is available in White and Black colour variants.

    What type of sim cards Moto G4 accepts? Does it has dedicated sim slots?

    It accepts two micro sim cards. You can use nano sim card also by using the adaptor which comes along with this device. It has 2 dedicated sim card slots.

    What is the maximum size of the microSD card capacity it supports? Can I use it to increase internal storage?

    It supports upto 128GB of microSD card. You can use it as internal storage.

    How to use microSD card as internal storage in Moto G4?

    You can use microSD card as internal storage by following the steps given below.

    • Go to Settings->Storage & USB.
    • Tap on to the SD card.
    • Now go to menu(3 dots in top right corner) and then Settings.
    • Select the option “Format as internal”.
    • Now, device will use sd card as internal storage.

    Note: Formatting the microSD card will erase all the data. So backup your data before formatting.

    What are the specifications of Moto G4?

    Below are the specification summary

    • Snapdragon 617 Octa core SoC and Adreno 405 GPU.
    • 2GB RAM and 16GB internal storage.
    • 5.5 inch full HD display screen.
    • Dual sim and microSD card support.
    • 13MP primary camera with LED flash and 5MP front facing camera.
    • 3000 mAh battery with fast charging support.

    What are the box content of Moto G4?

    In the box we get, smartphone, manual, USB charging cable, earphone and turbocharger.

    What are the drawbacks of Moto G4 compared to Moto G4 PLus?

    It lacks Fingerprint scanner. It has 13MP sensor without laser auto focus. Whereas, Moto G4 Plus has fingerprint scanner and it features 16MP primary camera with laser auto focus.

    How to take screenshot in Moto G4?

    You can capture screenshot in Moto G4 by press and hold power button and volume down button simultaneously. Below the video demonstration on how to take screenshot on Moto G4. The screen capture method on Moto G4 and Moto G4 Plus are same.

    How to set custom MP3 ringtone in Moto G4?

    I have made detailed post on this for Moto G4 Plus. It works on this device as well. You can refer it on my previous post how to set custom ringtone on Moto G4 Plus.

  • How to set Custom Ringtone in Nexus 5X and Nexus 6P

    The way to set  custom ringtone and notification in Nexus 5X and Nexus 6P are not direct. It needs little work around to get it done. There are multiple ways to do it. In this post, we will focus on two of the simple methods. So let’s get started on How to set Custom Ringtone in Nexus 5X and Nexus 6P.

    Set custom ringtone in Nexus 5X and Nexus 6p

    How to set Custom Ringtone in Nexus 5X and Nexus 6P

    If you want to set your favourite MP3 songs as ringtone or add a new ringtone to Nexus 6P or Nexus 5X, here are the two different ways to achieve it.

    How to set Custom Ringtone in Nexus 5X and Nexus 6P through PC without using the any App

    • Connect your phone to PC/ Laptop via USB cable.
    • Browse the folders of Nexus 5X/Nexus 6P from PC explorer.
    • Go to the folder called ringtones under internal storage.
    • Paste the MP3 or other ringtone which you want in this folder.
    • Now under, Sound and notification->Phone ringtone on your phone, you will find your ringtone. Tap on it to choose that ringtone.
    • If you want custom notifications, just paste the notification tone to the Notifications folder.

    How to set Custom Ringtone in Nexus 5X and Nexus 6P using a file explorer

    Here is the guide to set a custom ringtone using a file explorer which is easier and can be performed from the phone itself.

    • First install a file manager such as ES file explorer.
    • Now to go to Settings->Sound and notification->Phone ringtone.
    • Now select ” Complete action using ES File Explorer.
    • Go to the folder where you have saved the ringtone and select it.
    • By this way, you can set a custom ringtone on your Nexus 5X or Nexus 6p.

    How to set different ringtone to different contacts in Nexus 5X and Nexus 6P

    In Nexus 5X and Nexus 6P, you have the option to choose different ringtones to contacts. Here is the guide through which you can set ringtone to the contacts.

    • First go to the contact which you want to set ringtone.
    • Tap on to Edit and then go to menu(3 dots in the right top corner).
    • Now tap on to set  ringtone.


  • Xiaomi Redmi Note 3 Vs Moto G4 Plus Which is better

    Xiaomi Redmi Note 3 and Moto G4 Plus are two mid range Android smartphones with 5.5 inch display screen. Both  have their own advantages and disadvantages. There is no perfect smartphone. But according to our requirement and budget, we need to decide on which phone to buy. So here is the comparison of Xiaomi Redmi Note 3 Vs Moto G4 Plus.

    Redmi Note 3 Vs Moto G4 Plus

    Recommended Reading:

    LeEco Le 2 Vs Redmi Note 3

    Redmi Note 3 Review

    Moto G4 Plus Review

    Comparison of Xiaomi Redmi Note 3 Vs Moto G4 Plus

    Design and build quality:

    • Redmi Note 3: Dimensions: 150 x 76 x 8.7 mm and weighs 164 grams.
    • Moto G4 Plus: Dimensions: 153 x 76.6 x 9.8 mm  and weighs 155 grams.

    Redmi Note 3 has all metal design which looks good. It is also slightly slimmer and compact. However, it weighs marginally more than the Moto G4 Plus. When it comes durability, Moto G4 Plus is better. Redmi Note 3 does not have Corning Gorilla Glass protection.

    Winner: Draw

    Display:

    • Redmi Note 3: 5.5 inch full HD IPS display screen with around 72.4% screen to body ratio and 408 ppi pixel density.
    • Moto G4 Plus: 5.5 inch Full HD IPS display screen with around 71.2% screen to body ratio and 408 ppi pixel density.

    Display panel on the both the device are good. But when we compare the display quality of Moto G4 Plus Vs Redmi Note 3, Moto G4 Plus looks better.

    Winner: Moto G4 Plus.

    SoC, RAM, OS and Performance:

    • Redmi Note 3: 1.8GHz Hexa Core Qualcomm MSM8956 Snapdragon 650 Soc With 3GB RAM with Adreno 510 GPU. It runs on MIUI 7 which is based on Android 5.1.1.
    • Moto G4 Plus: 1.5 GHz octa-core processor MSM8952 Qualcomm Snapdragon 617 with 3GB RAM and Adreno 405 GPU.  It runs on latest almost stock Android 6.0.1.

    Moto G4 Plus overall performance and gaming performance both are excellent and better than the Redmi Note 3. However, it is let down by heating issue. If you are running graphic intensive games like Asphalt 8, Nova 3 etc for extended period of time, it tends to heat up(The temperature touches upto 48 degree). Redmi Note 3 is a decent performer. But, there is visible lag while playing games like Nova 3.

    Winner: Moto G4 Plus(Except heating issue).

    Storage:

    • Redmi Note 3: 32GB of internal storage and microSD card support.
    • Moto G4 Plus: 32GB of internal storage with microSD card support.

    Redmi Note 3 comes with hybrid sim slot. So you cannot use second sim card and microSD card simultaneously. Whereas Moto G4 Plus comes with dedicated microSD card slot.

    Winner: Moto G4 Plus.

    Camera:

    • Redmi Note 3: 16MP primary camera with F/2.0 and dual LED flash. 5 MP front facing camera with F/2.0.
    • Moto G4 Plus:16MP primary camera with F/2.0 and Dual LED flash. It also has laser auto focus. 5MP front facing camera with F/2.2.

    When we compare Redmi Note 3 Vs Moto G4 Plus camera samples side by side, both are very close in good lighting condition. However, in low light condition and artificial lighting conditions, Moto G4 Plus performs better. Also in video recording section, Moto G4 Plus fares better.

    Winner: Moto G4 Plus.

    Battery:

    • Redmi Note 3: 4050 mAh battery with fast charging capability.
    • Moto G4 Plus: Non-removable Li-Ion 3000 mAh battery.

    In this section, Redmi Note 3 is way ahead of Moto G4 Plus. It provides one of the best battery performance in this price segment.

    Winner: Xiaomi Redmi Note 3.

    Price:

    • Redmi Note 3: Rs.11,999 for 2GB RAM with 16GB storage variant and Rs.11,999 for the 3GB RAM variant.
    • Moto G4 Plus: Rs. 13,499 for the 2GB RAM and 16GB storage variant and Rs.14,999 for the 3GB RAM with 32GB internal storage variant.

    Winner: Redmi Note 3.

    Summary of Xiaomi Redmi Note 3 Vs Moto G4 Plus comparison:

    Redmi Note 3 and Moto G4 Plus are very good mid range smartphones. Based on the requirements, one can choose between them. If you want a smartphone which has good ergonomics, good camera, good display screen, latest Android version with stock experience, Dedicated microSD card slot, then Moto G4 Plus is the better option. If you want a phone which has excellent battery life, Decent display and camera, affordable pricing, metallic build, then Redmi Note 3 is better.